Tag Archives: scrapbook layout

Free Cut file | 12×12 Layout and cards – Stellar Shapes

Hello Nerds!

It is the beginning of the month, which means it is time for a new free cut file… YAY!!!  This new file designed by Ashley Horton from The Cut Shoppe is filled with some amazing designs with infinite possibilities.

This cut file is a must in your digital library, and you can obtain your free digital copy by visiting the Scrapbook Nerd Store.  But before you head to our store, let’s see the cut file in action.

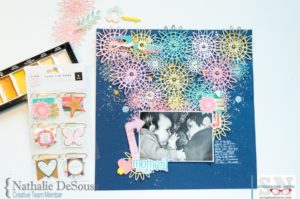
Nathalie is first with her take on one of the images of the Stellar Shapes file and Paige Evans’s “Turn The Page” collection.

She was inspired to create this page filled with color that documents one of her favorite picture of her kids first year together.

She used one of the images in the Stellar Shapes cut file to cut it from papers in the Turn the page collection (different papers, and sizes), and then used a bit of mixed media, and machine stitching to create a fun background for the page.


She even used some of the shapes as layer pieces behind the picture, but let’s see a more in-depth look at how this page came together in the following video:

We hope you enjoyed the video!  Isn’t the background just colorful and fun!  We love how she used the image on her page.  Now let’s see Joy’s take on the Stellar Shapes cut file.


Joy used one of the Steller Shapes to create a mask to use with some mist to make a simple
Holiday card. She used some temporary adhesive to stick the Stellar shape onto 4×5.25 kraft coloured card front.Stellar Shapes Holiday card After the mist dried Joy add a sentiment and some Nuvo Crystal Drops for a bit of embellishment. 
I think these Stellar Shapes can be used in so many ways.

Head over to the SN shop to download your Stellar Shapes today.
Happy crafting!

scxrapbooknerd.com supply list

Stellar Shapes cut file, Turn the Page collection – 12×12 paper pad, ephemera, clips, wood venner, sticker book,  Gansai-Tambi -Starry Nights water color palette,  Nuvo drops in gold,  American Crafts cardstock – Sapphire


Creating a background with Distress Oxides

Step by Step paper crafting tutorials @ scraobooknerd.com

Step by Step paper crafting tutorials

Hello there!

It finally looks like we have passed our Winter season!   Trees are starting to bloom, and soon everything will be once again full of light and color.

In fact this month’s reveals are inspired by color, and for this week’s tutorial, I want to invite you to discover Distress Oxides,

This new medium is so easy to work with, as it combines dye and pigment inks in one simple package.  The combination of the two creates a matte effect (due to the pigment) on the paper but allows the colors to shine on their own, and not to become muddled when mixed together.

Here is a small video on how the layout and background came together, so grab a seat, and ENJOY!


As you can see in the video,  I used a combination of Faded Jeans, and Cracked Pistachio  Distress Oxides to recreate the color of the water in the picture.   The colors, when layered, did not fade into a dark teal -which would have happened- had I used another medium.   I have played with some of the other hues and can say that you can create a multi-color background without muddling the effect by allowing the colors to dry a bit in between.  I will work a layout to show you in the near future.

Here are a few close-ups of the effect the Distress Oxides  look like once dried:

I love how the background looks like splattered water behind the picture and large title, and it was perfect to frame this picture of my daughter and niece enjoying our backyard pool. The colourful, and beautiful Bella Blvd. “Secrets of the Sea” collection was the ideal to complete this page.

Here is the final layout:


I hope you feel inspired to check the Scrapbook Nerd store for all the new colours of  Distress Oxides, as well as all the new collections available there.   You can always leave a comment if you have a question on how this came together.

See you all soon!

Nathalie @ scrapbooknerd.com

https://static.inlinkz.com/ppr.js

ScrapbookNerd.com

Paper Rosettes for Valentine’s Day


Happy Valentine’s Day to you all!

We hope that you all spent time with your loved ones today ❤

Since today is all about love, i set to create a project using paper rosettes.   I was inspired by the embellishments from Crate Paper’s Heart Day collection, to use rosettes in a layout.  So i am giving  my Cameo the day off, and instead pulled out some strong glue, and some knock out punches for this tutorial.

For the paper rosettes created for this project you will need paper strips of 1×12 in dimension, or if you are working with 6×6 paper pad all you have to do is glue to strips of 1x 6 in together (at about 1/4in from one of the short edges on one side only).


This step is optional:   To create a more embellished edge on your rosette, cut strips of about 1.5 to 2 in in width, and use a punch or knock outs to create a border.


If you have a scoring board then create scoring lines on the strip at about 1/4 in intervals.   In my case, I used my paper trimmer’s scoring attachment to create the score lines.


The strip of paper will look like an accordion after all the scoring has been completed.


Now using strong glue, or silicone glue (hot glue) simply join the edges short edges together.  In some cases you might have to tuck in one of the folds to achieve a perfect accordion circle.


You will also need a small square or circle scrap of about 3/4 in  to help keep the rosette together.   Make sure you have your choice of glue ready at this stage (i used Scotch tacky glue to keep the rosette together, until i could reach the glue gun).


Now using your fingers apply some pressure to the center of the accordion circle, until the accordion collapses into what resembles a circular fan.    Make sure that the small piece of paper is ready to be glued to the center of the fan.


Using the glue of your choice ( i would recommend silicone glue) attach the small piece of scrap paper to the close center of the rosette (preferably in the back), and hold it in place until the glue has completely dried.  You could also add the small piece of paper to the front of the rosette, in that case, make sure it is cut into a small circle or figure, as it will become the center point of the paper rosette.


To complete the rosette (this is optional), add a small piece of decorative paper, a brad, an enamel shape, stickers, buttons or what you chose to the center of the rosette.
These rosettes are super easy to create, and are easy to use in cards, layouts, and general crafts.


Since we are on Valentine’s Day, I used papers from Simple Stories’ “Love and Adore” collection,  and Crate Paper’s “Heart Day” & ” Snow and Cocoa” collection to build the rosettes.  I picked different papers that had a lot of pink in them.


I chose to put the neutral (black and white rosettes) at the bottom of the cut-out heart shape on the layout, and added the pink rosettes on top of the black and white ones.   In addition, I chose to just add centers to the rosettes that will be more prominent on the layout.


I only filled one half of the heart with rosettes, and used the other half to document a picture of my hubby and I on our 16th wedding anniversary.  Here is the final layout:


The rosettes bring a festive look to the page, and add lots of dimension to a project  (this layout fits tightly inside a page protector).  I hope you give it a try, and use up those paper scraps.   Like i mentioned they are perfect to create cards, and other projects.

As always don’t forget to contact me if you have any questions.

See you all soon!


Nathalie @ scrapbooknerd.com


https://static.inlinkz.com/ppr.js

ScrapbookNerd.com Canadian online paper craft supply store

Silhouette Savvy – Creating compound designs

V2-Nerd-Academy-600x132

Hello everyone!,

Nathalie here, I hope you all are enjoying the beautiful weather, and using the extra daylight to create beautiful projects.

For this tutorial – and continuing with the Silhouette Savvy series -, we will be exploring how to create a compound design by welding shapes together using the Silhouette Studio program.   For this project we will be using the new cut file, “Camp Glamp”, designed by the Cut Shoppe, and available for free at the Scrapbook Nerd store.

Free digital cut File available at ScrapbookNerd.com

Many times when we look at a cut file, most of us only think on how the single image would fit into a project.  However, by following a few steps, the single image can be transformed to fit your project’s needs, and create a new unique cut file.

The heart image of  the cut file was multiplied two times  to create a new cut-file of three linked hearts.  Here is a small video on how the cut-out was created on Silhouette Studio by welding images together (this process can be applied to any cut file shape):

I hope you enjoyed the video; just in case you missed a step, I am adding a small point form list of the procedure steps:

  1. Trace the shape / shapes that will be used on the project  (for more information on how to trace an image, please refer to the previous Silhouette Savvy tutorial).  Make sure that each shape is traced individually.
  2. Select each individual image, highlight the individual image, select modify (or right button click on the mouse), then select Make Compound Path
  3. Repeat step 2 for each  shape that will be joined/ welded on the design.
  4. Arrange the images, to your liking, making sure that the edges that will be welded together either overlap, or are touching together.  Images will be welded, only if they are touching.
  5. Select all the shapes that will be welded (they will all be highlighted), select modify (or right button click on the mouse), then select Weld.
  6. Now the image is ready to be cut.

By following these steps, you will be able to create new cut files from your existing images and cut files, like the one i have created for this project.

I chose to back the cut out with some vellum (just behind the word Create), and color the letter space with gold paint.  To create the mat behind the cut-out, i used watercolor on a gessoed yellow cardstock.   Once i glued the background, I used different embroidery thread to hand stitch the edge of the cut-out.

a close up to the details in the heart cut-out..

Finally I added my picture, ephemera, and a few butterfly cut-outs all around the page.  Here is the final layout created with this welded image.

CREATE - Silhouette Savvy tutorial @ScrapbookNerd.com

the completed layout

I hope this serves as inspiration to use cut-files in a new way.   Don’t forget to pick up a copy of the “Camp Glamp” cut file,  it is available for free at the store.

As always, please do not hesitate to contact me with any questions about the layout, or if you are having issues with the welding process on your Silhouette program.   Also let me know if there is something you will like to learn about your Silhouette and its software.

See you soon!!

Nathalie @ scrapbooknerd.com

ScrapbookNerd.com Canadian online paper craft supply store

MY Minds Eye – with Cathy

Creative Team projects at scrapbooknerd.com

Cathy @ scrapbooknerd.com


This week was my opportunity to work with My Minds Eye – On Trend2 and My Story, paper and embellishments.  Bold geometrical and floral patterns, rich colours, red, pink, teals golden yellow and black with gold foil accents . I was one happy scrapbooker!   The embellishments are plentiful with stickers, wood veneer, and my favourite chipboard buttons.

 Project -1-  The twine flowers with the chipboard centres were the subject of this weeks tutorial of which you can find below in the next post.

   Family Photo

Project – 2 – Perfect for a family get together for my son’s birthday, fun, colourful , and a lot of family love!

Paul's BD

Project -3 – Another celebration,  our Grade 12 graduate heading off to the certificate ceremony and looking beautiful!

Live Your Dreams

Thank you for stopping by I enjoyed sharing my projects with you this week! Until August, Happy Crafting everyone!


ScrapbookNerd.com

Playing With Ombre – Pops of Colour

V2-Nerd-Academy-600x132

Hello everyone! Stephanie here, the newest Nerd on the block, with a really simple tutorial on how to go about adding a pop of colour to your layouts.

I began by putting together a simple 12×12 layout using products from October Afternoon’s Treasure Map collection … but when I finished adhering my photo and the embellishments, I couldn’t help but feel that the layout lacked a bit of pizzaz. I decided to use the Hero Arts ombre ink pads and the Kelly Purkey New Adventures stamp set to add a bit of colour to the off-white background.

DSC_0588

The ombre ink pads have 3 separate strips of colour. If you were stamping one single image and wanted it to have an ombre effect, you would shimmy your stamp from top to bottom to make sure the stamp picked up a little of all three shades. Instead, I used a star stamp (small enough to fit into each strip) and carefully stamped one shade at a time onto my background.

DSC_0589

DSC_0590

Here’s how it turned out …

northshore

Products Used: 

Stephanie @ scrapbooknerd.com

ScrapbookNerd.com

Kim’s August DT Reveal

Creative Team @ scrapbooknerd.com
Good morning Nerds!

I can’t believe we are already into August!! This DT term has flown by!! This is a bittersweet post for me as I’ve come to the end of my DT term here at Scrapbook Nerds…It’s been a pleasure playing with y’all!

I’ve also had a blast playing with all of the yummy goodness Barb and Joy have provided!! Especially this line…although I had a really hard time cutting up these purdey Lucky Starz papers from Bella Blvd…I LOVE them and I tend to hoard rather than cut up papers I love! LOL!! But…it was to scrap a pic of my most favourite toy…MY BIKE!! (Although I did totally cheat and used the cover sheet from my collection pack! LOL!!) I also played with some YUMMY dies from Kaisercraft…eeeeeks!!  I also pulled in some papers from Echo Parks Here and Now collection. I love mixing manufacturers!!

“Crazy Horse has been a very faithful friend to me for that last 15 years and while I’ve got a new ride now (Kemosabi) I still have a very soft spot in my heart for this old girl! Whenever life got a little much to bear this girl was always there for me. With a good kick she would roar to life and braaaaaaaaap my worries away. I wasn’t usually the fastest on the track (obviously from all of the mud on my number plate) but I definitely had the most fun out there! I always felt like a rawkstar throwing a leg over my pretty girl. What I love even more is that now Caitlin is racing Crazy Horse and KILLING IT on a 15 year old bike! Not only is this bike still one of the prettiest ones on the track, she’s still got it!! WAAAAAAAAHHHHHHHHHOOOOOOOOOOOOOOOOOOOOOO​O!!!”

IMG_20150811_0939032Kimprojectstrip (1)


I LOVE the colours in this Lucky Starz line from Bella Blvd!! SOOOOO FUN!!
Here’s a little throwback photo from the summer of 1998…Caitlin and her “Gamma” (she couldn’t pronounce her “r’s”…) playing in Gamma’s backyard. They have had a very special bond right from day one and the two of them still hang out and play together. Hard to believe this chubby cheeked little bean is heading off to university in a couple of weeks…sigh…

IMG_20150813_1933492Kimprojectstrip (1)

Here’s a close up…

IMG_20150813_193400Kimprojectstrip (1)

I tried something a little different and even daring (for me) with this project. I have a little thing with doilies (although I’m happy to report that after my term with SN DT I am down from 5000 to just under 4000 doilies left…WAAAHHHHOOOOOOOO!!) I have really enjoyed playing with the gelatos and wondered if I could colour my doilies with them…YES YOU CAN!! Love how well they compliment the fun and happy colours of the Lucky Starz line from Bella Blvd!

Here is a super quick layout of Cate in her natural habitat. I swear she is part fish!!
@ The Grotto, Tobermory Summer of 2012

IMG_20150814_0742192Kimprojectstrip (1)

Here’s a few quick and easy cards using some scraps from the delish Lucky Starz line from Bella Blvd and dies from My Favourite Things and Kaisercraft.
Super quick and super easy!

IMG_20150814_0743162Kimprojectstrip (1)

This one is a fun little shaker card…

IMG_20150814_0743262Kimprojectstrip (1)

A closer peek…

IMG_20150814_0743432Kimprojectstrip (1)

I LOVE this line from Bella Blvd! Lucky Starz worked perfectly with my new MFT Abstract cover up die! Couldn’t ask for a quicker or easier card!!

IMG_20150814_0747052Kimprojectstrip (1)

Well that’s it for me creatively speaking but I would like to thank Joy and Barb for inviting me to be a part of their design team. I’ve had a blast and loved challenging myself to go outside my comfort zone to create. You two ladies have created a very special place for us scrappers to come and share not only our creative stuff but also our lives. You guys RAWK!! MWAH!!!

Thanks for letting me share! Happy scrapping Nerds!

Kim @ ScrapbookNerd.com

http://static.inlinkz.com/ppr.js

Kim’s May DT Reveal

Creative Team @ scrapbooknerd.com

What kind of May DT reveal would it be without a salute to my Mom??!
I loved how soft the peachy tones are in the Maggie Holmes Confetti line…perfect for scrapping my mom who happens to love peachy colours!!

Love that SN offers cork in a 12×12 sheet which I used as my background and it great to die cut too!! Here I used some die cut cork hearts to make some “love-ly” stick pins…

I used the treat bags for some hidden journalling…a verbal “treat” lol!!…
It reads…
This woman is one of the most amazing people I know.
I didn’t always know that about her. I admit, for many many years while growing up she drove me absolutely crazy with her random logic and impossible rules. I didn’t understand that she was looking out for me and my sister the very best she could. I didn’t understand how much she sacrificed to be our mom. I didn’t know and I was an impossible child. I had a very strong will and a stubborn streak that broke alot of the adults in my world. But she was never one of them. She put up with my temper tantrums (still does) and listened to me rant and rave (still does) because she knew that I needed to. She took the brunt of my anger and frustration more times than she ever deserved and she would wait out the storm and then hug me and tell me she loved me. She wasn’t a saint and made her share of mistakes but I always knew she was in my corner no matter how out of sync I felt with her. To be honest I didn’t realize how amazing she was until I had kids of my own. Now I get how impossible it feels sometimes to try to do what’s right for you and your kids when life overwhelms. And for many years she did it all on her own. There are so many decisions that I know she made that broke her heart to make but she did because it was in my best interest. Including leaving her home, her friends, and her successful business to move an hour away just so she could be close by me while I was sick. She took care of Caitlin and then Maegan for days at a time because I was too weak to move. She brought food that I couldn’t eat. She hid her disappointment and fear so that I could concentrate on getting well. She fielded questions from family and friends so I could save what strength I had. And she bit her tongue and allowed me to play even though it scared her because she knew that sitting at home and living in a bubble was no life at all for me. I couldn’t have gotten through that part of my life without her and I can’t imagine life without her.
Thank you mom. I love you more than I can ever express. Happy mother’s day!

IMG_20150514_1347512Kimprojectstrip (1)

This felt a little outside my comfort zone but I’m stoked over how it turned out!!
I have really enjoyed playing with the Confetti line and I have to say…WAAAAAAHHHHHHHHHHOOOOOOOOOO!! I love it when a paper line pushed me to try something a little different..Hope you do something today that is a little outside of your comfort zone and be sure to share it with us!!

IMG_20150511_1315562Kimprojectstrip (1)

May cork challenge @ scrapbooknerd.com by KimKimprojectstrip (1)

http://static.inlinkz.com/ppr.js

Be sure to check out this line…so delish!!
Thanks for letting me share!
Kim @ ScrapbookNerd.com

ScrapbookNerd.com

New Digital Cut File

ScrapbookNerd & TheCutShoppe FREE cut files

Hello bloggers,
Is anyone else wondering where March went?  We sure are.
I feel like this would be an appropriate spot for Ferris Bueller’s famous quote….”Life moves pretty fast if you don’t stop & look around once in a while, you could miss it.”

Be sure to check out the link up party we’re hosting below, share your projects
using Scrapbook Nerd free cut files.

So with the beginning of a new month, we have a new digital cut file to share with you. Remember they are FREE to download in the ScrapbookNerd.com online store 🙂

Foodie for Life FREE cut file available at ScrapbookNerd.com - designed by TheCutShoppeCreative Team Member Joy created this layout to document her families change to eating Paleo friendly foods. Joy used the Silhouette cameo to cut out the ‘nom nom’ file to add to her background for a cool tone on tone look with the kraft paper.

Health Food scrapbook Layout by Joy at scrapbooknerd.com health food scrapbook layout foodie for life free cut file available at scrapbooknerd.com health food scrapbook layout

The title was as cut using the SNF Miss Molly font which is
available in the Silhouette Studio store. 

We would love to see what you are making with Scrapbook Nerd Free cut files.
Link up your projects using at least one SN cut file and you could win one of three
random RAK’s (RAK = random act of kindness) from Scrapbook Nerd.

//static.inlinkz.com/cs2.js?v=116

ScrapbookNerd.com