Making Cards by Mixing Manufacturers | Mari Clarke

Welcome to the Scrapbook Nerd blog today, January 29th, 2019!  Today I am sharing some cards I made with a variety of products in my stash, showing how you can mix and match products from different companies to make some fun cards!

I used 80 lb. Neenah Solar White card stock for all of the stamping and die cutting and I used 110 lb. Neenah for my card bases.  All three cards are A2 sized side folding cards.

This first card is one of my favorites.  I used the Avery Elle Starry Scene stamps and dies to create the starry night sky, the mountains and the trees.  I stamped the sky with Distress Oxide Inks in Peacock Feathers, Evergreen Bough and Chipped Sapphire.  I stamped the little deer and bunny from the My Favorite Things Dashing Deer stamp set and I used the dies from this set to cut them out. All of the images for this card have been colored with Copic markers.

For this second card, I used the Avery Elle PhotoMat die to create the little polaroid element!  I used Distress Oxide Inks in Tumbled Glass, Evergreen Bough, and Twisted Citron to create the color within the polaroid.  The adorable snowman is an image from the Penny Black Christmas Bunch stamp set; how cute is he!  The other die cut pieces were cut from the Lawn Fawn Really Rainbow 6×6 paper pad, as was the card front.  My little snowman was colored with Copics.  I finished all of my stamped images in these two cards with Nuvo Shimmer, Nuvo Glaze, Shimmer Spritz and Nuvo Glitter Accents.

This third and final card was created using the Pink Fresh Fancy Floral 2 die background.  I cut the card front using some glitter card stock from the Brutus Monroe Glitter Stock Sampler 6×6 pack.  This is one of my new favorite supplies.  All the heart eyes for this paper.  I created a shaker element using some Cheery Lynn Acetate (backing my card front) and some Studio Katia Shimmering Ice Fushion sequins.  The Congrats sentiment was created using a Lawn Fawn die and some Tim Holtz Metallic card stock in silver.

I love mixing my card making products to come up with unique designs.  It’s fun to see what you can create with all of these fun supplies!! Make sure you hop over to the Scrapbook Nerd shop to check out the fun card making supplies available.

You can check out my process video on YouTube for all three of these cards!

Thank you so much for stopping by today!

xxMari

Creative Team Weekly Digest

Hello friends!

Nathalie with you today to just give you a little inside look at what the design team has been up to this week.

First up is Mari with this beautiful layout ,

In Mari’s words, ” Creating masculine layouts can be challenging. Finding a collection that is perfect for a masculine layout makes this challenge so much easier. The PinkFresh Be You collection can easily be adapted to a feminine or masculine layout.”

Mari created this layout with plenty of white space, using some 6×6 paper from the collection and the die cuts, wooden buttons, puffy stickers and alphas to complete the layout.

Such a beautiful layout all about her son using the rather femenine Be You collection from Pinkfresh Studio


Now it is my turn to provide some inspiration:

This week my focus was on using the new Pebbles’ Along The Way collection. For this i chose a cut file from Handipaper, and used the different patterns in the papers to detail the cut out.

All the floral motifs in the pattern paper and ephemera can be easily fussy cut and used in clusters around your images. You can find a detailed video on how this page came together in the previous post.

That is all for us this week, remember to check the store for new products arriving. This weekend Creativation is taking place, and lots of manufacturers will be showcasing upcoming products; Joy will be happy to give you more information on the availability for the product as well as special order any of the products upon request – please email Joy at info@scrapbooknerd.ca for more information.

XO

Having Fun with Along The Way

Hi there!

Nathalie with you today with a new layout that showcases the new “Along The Way” collection from Pebbles.   I  am a confirmed paper lover, but nothing makes me happier than finding collections that can be used in everyday documenting.   This collection has rich colors, and many designs that can be used at any season or time of the year.


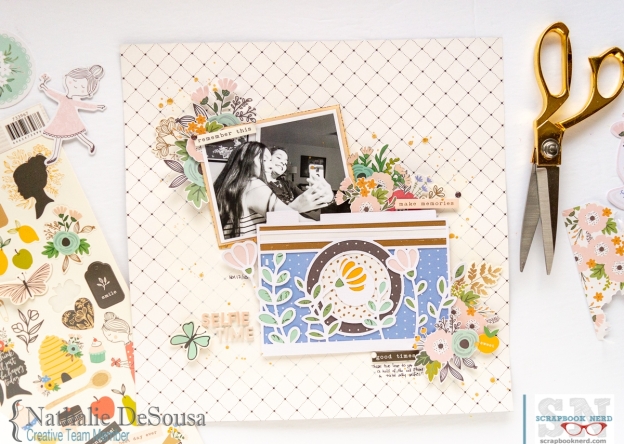
What better way to showcase a collection while documenting a picture than to detail backing a cut file.  For this layout, i chose a cut file from Handipaper, Floral Photo Camera to create one of the focus points of  this page.


This cut out is rather simple in design with intricate details, so i was careful backing each of the small areas of the cut to make sure that the small details come forward.  All the patterned paper in the collection made it so easy to bring the camera to live for this page.  The following video will show you a more in-depth look on how the page was put together:


The placement of the picture in the page, along with the detailed camera are the focus of this page.   However all the fussy cut floral motif from the patterned paper, ephemera and stickers bring softness to this page.


To avoid taking the focus away from the picture and cut out, a simple title was created using alphas from the Whimsical collection from Pink Paislee, and accenting it with a sticker from the Along The Way collection.


I hope this has inspired you to stop by the Scrapbook Nerd store to check all the materials used in this page.   Remember there are always new goodies arriving at the store!

As always, if you have questions on how this came together, please just leave me a comment here.

XO


Pebbles – Along The Way collectionn -12×12 paper pad, 6×8 paper pad, ephemera, stickers, word stickers, enamel dots

Pink Paislee – Whimsical collection – foam alphas

Heidi Swapp –  Gold Lame colorshine

WRMK – Mini Guillotine


Sketch Sunday l 01.13.19

Sunday Sketches

I hope all of you are enjoying 2019 so far. As I mentioned in my last post, 2019 is going to be a busy year in my house. Because of that, the format of Sketch Sunday will be changing a little. I’ll still be posting on Sundays but it will go down to one Sunday per month and there may only be a sketch without a full-color page to go along with it. I hope you’ll stick with me!!

2 photo layout sketch, scrapbooknerd.com

This week I am in San Juan Puerto Rico waiting to board a cruise ship with a great group of fellow scrapbookers so I’m bringing back a sketch from the past. This one features a single photo placed inside a large circle.

Winter Semi layout by Milena Woodiwiss

I trust you will find this sketch useful and I look forward to seeing your creations.  I’ll see you all again in February!

Milena W - designer at scrapbooknerd.comScrapbookNerd.com Canadian online paper craft supply store

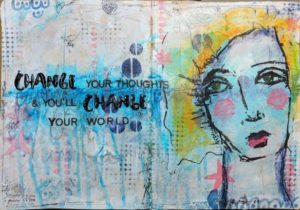
Change art journal page by Joy Atkinson

Theme Challenge – Change or New Beginings

Hey there crafty friends, welcome back to the SN blog.

The starting of a new year for many is a fresh start, a time to start new routines, or make resolutions. Personally, I think we can make changes anytime throughout the year and I’ve been thinking about this change to several months. I have some creative goals set out and I have to make some changes to accomplish them. One goal is making space for more creative time (including videos)…I burned the midnight oil and got it finished.
The first video from me for 2019. Check!

The Nerds challenged us to use the theme Change/New Beginnings for our projects. I got out one of my big Dina Wakley Media journals along with some other products from DW.
I did not have a plan for this when I started except that I wanted to use a Face from the DW Faces Collage paper pack.

I hope you enjoy seeing how this page evolves.

Change art journal page by Joy Atkinson Change art journal page by Joy Atkinson

Stay tuned later this week the rest of the creative team here at SN will be sharing their projects using the same theme.

Let me know in a comment if you’ve set any creative goals this year and what they are.
Happy crafting!

Joy @ scrapbooknerd.com

Sunday Sketch 123018

Sunday Sketches | 12.30.18

Welcome to my last Sunday Sketch post of 2018! I can’t believe the year is almost over. 2019 is going to be a busy one for me, filled with a lot of change and adventure. Bring it on!

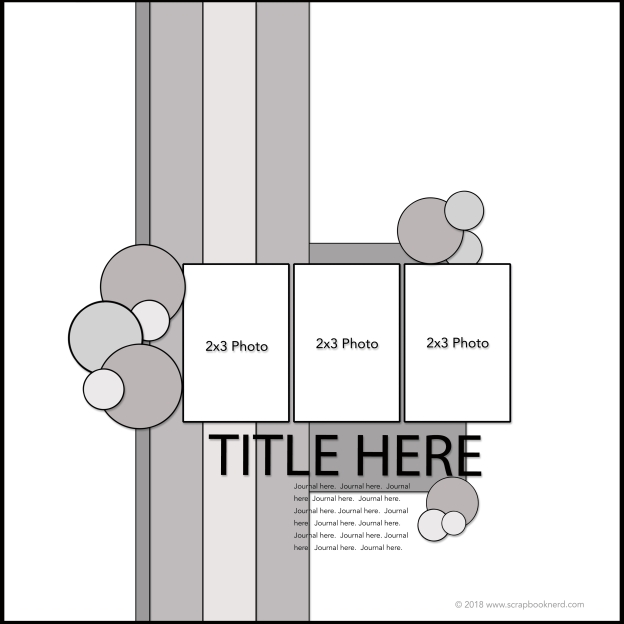
For this week’s sketch, we have 3 – 2×3 vertical photos.

Sunday Sketch 123018

I’m really enjoying using smaller sized photos on a page lately. I find the 2×3 just perfect.

My page uses the Freezin’ Season collection by Simple Stories. We just got a cottage and are planning on being there as much as we can manage this winter and this paper is just perfect.

123018 Page

123018 Detail

Wherever you are and however you celebrate, I wish you the Happiest of New Years!! I hope you find the time before heading back to the hustle and bustle of everyday life to do some creating. Please feel free to share your creations on the Scrapbook Nerd Facebook page.

Here’s to 2019!! I hope you manage to craft as much as you desire.

Milena W - designer at scrapbooknerd.com

ScrapbookNerd.com Canadian online paper craft supply store


Sunday Sketch 121618

Sunday Sketches | 12.16.18

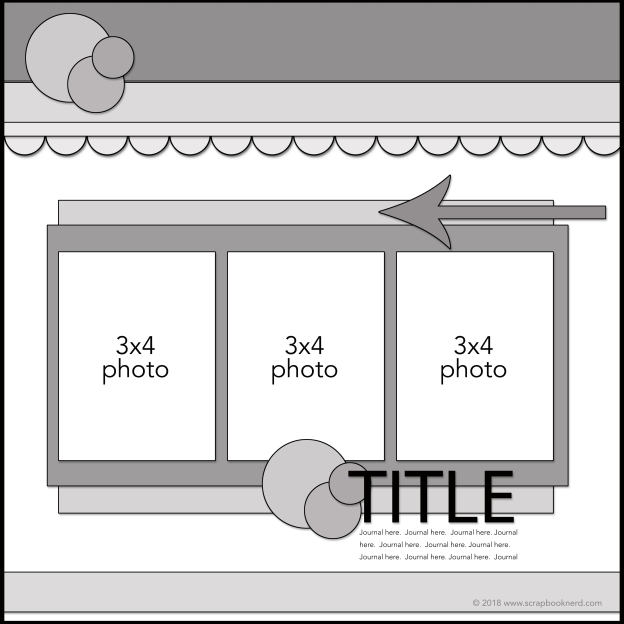
It’s time for another Sunday Sketch. This sketch features 3 – 3×4 photos backed by 2 mattes and surrounded by paper strips.

Sunday Sketch 121618

I only had 2 photos to use on this page so I substituted one of the photos with a 3×4 journal card from my paper kit. I also had minimal journaling so I used word strips in its place.

Sunday Sketch 12.16.18 Page

Sunday Sketch 12.16.18 Detail

I used the Photoplay O Canada Christmas collection for my page.

I hope you’ve enjoyed this weeks sketch. Please be sure to share your creations in the Scrapbook Nerd Facebook page. We’d love to see what you make with this week’s sketch.

Milena W - designer at scrapbooknerd.com

ScrapbookNerd.com Canadian online paper craft supply store


Creative Team Weekly Digest

Hi there!

It is getting closer and closer to the magical days of Christmas.  We are so excited to welcome the holidays and  document all the memories that come with this season.   Our Design Team has been busy creating projects that will inspire you.  First  up Mari.


Mari created these Christmas Tags using the Lawn Fawn Say What tag dies and the Lawn Fawn Holiday Critters stamp and dies. The patterned paper used as accents is from the Really Rainbow Christmas, also from Lawn Fawn. There are so many options with these stamps and dies; the middle tag has a shaker element using sequins and shaker mix from Studio Katia.


It’s fun to make your own tags at Christmas time to attach to a gift for someone you love! They will adore these fun tag elements!   Thank you so much Mari for these beautiful tags!

Next up is Nathalie and her colorful Holiday layout,


This week’s tutorial focuses on creating embellishments that will work with the ones in the Holiday collections,  Nathalie chose the new Merry Days collection from Crate Paper, and used mixed media and cut files to create the colorful background.


You can read more about her layout and see how it all came together in the previous post.   The colors of the trees are nicely accented with gold and embellishments from the collection.


Well, that is all for us today.   We would be taking a small break to enjoy our families and the season, so let us take this opportunity to wish you all peace, love and joy during the upcoming Christmas and thank you for all your support this year, we wish only the best for 2019.

Have a blessed holiday season!


Nathalie D - designer at scrapbooknerd.com


Tuesday Tutorial: Creating Embellishments for your layouts

Hi there!

It is December!  Cue the confetti!!!  it is the jolliest and happiest of times (for some of us that is!) so, what better way than to celebrate it with color.  Today, I want to show you a simple way to make the most out of your Holiday collections while customizing some embellishments for your layout.


When I think Christmas, I always think of festive times with lots of color.   Unfortunately, the Merry Days collection from Crate Paper has color, but it is not as vibrant or festive as i have in mind for this layout.   Then, my choice was to create my own embellishments that will bring that much needed color to the page.   The following video will show you how it all came together:


As you can appreciate from the video, the colorful Christmas trees are customized to bring vibrancy to the existing colors of the collection.  The color is saturated in the trees so that they can show the small drops of white paint that are trying to create  snow capped branches.


The colorful trees are the basis for this page, as they bring the color and focus of the page to the picture of my two kids on their last day of school before the Christmas break.


By adding accents of gold in the embellishments used in the page, I am able to marry the new created colors to the pre manufactured stickers and embellishments.


All the colorful embellishments and background of thie page are the perfect background for this happy memory of my kids a few years ago.


I really hope you are inspired to customized embellishments and backgrounds for your next layout,  Remember you can always contact me if you have questions on how this came together.  Also, you can find all the materials used in this layout in the Scrapbook Nerd shelves so, stop by to check them and all the new arrivals.

Have a blessed day!


Nathalie D - designer at scrapbooknerd.com


Merry Days collection: 12×12 papers, 6×8 Paper pad, chipboard stickers, puffy stickers, cardstock stickers, word stickers

Jane Davenport Mermaid Markers

Heidi Swapp Color shine in Gold Lame

Vicki Boutin Foundation paper


Creative Team Weekly Round-Up

Well hey there friends, welcome to the Scrapbook Nerd blog today!  We hope you had an amazing week and found some time to get crafty.  We have some inspiration for you this week with some projects the creative team has been busy working on.  First up is Nathalie!

Nathalie created this page using the new Pinkfresh Studio Holiday Vibes collection. She used a cut file from Handipaper to create the large title, and then used the 6×6 paper pad to back the leaves and flowers.

She chose to use vellum for some of the buds of the cut out, and also used alcohol inks to add some color to them. She hid her lines of journal in a tag behind the picture, and then used a punch to create the scalloped edge at the bottom of the page.

The final cluster is made from fussy cut images from the 6×6 paper pad.  Gorgeous layout, Nathalie!

Mari created a 12×12 layout also using the Holiday Vibes collection!

Mari created a wide border on the left side with the dark blue paper, backed by another patterned paper that has the dots and phrases on it.  She used the Distressed Alphabet cut file from JustNick for part of the title and then the wood veneer alphas from the collection for the subtitle.

Computer generated journaling strips were used to document the story; a fun Christmas shopping trip from 2017 is the focus of the layout.  The Holiday Vibes collection from Pinkfresh Studio is a winner!  Make sure you take a minute to head over to the Scrapbook Nerd shop and check out all of the fun products!

Thank you so much for stopping by today!  Hope you have an awesome weekend!