Tag Archives: cardmaking

Making Cards by Mixing Manufacturers | Mari Clarke

Welcome to the Scrapbook Nerd blog today, January 29th, 2019!  Today I am sharing some cards I made with a variety of products in my stash, showing how you can mix and match products from different companies to make some fun cards!

I used 80 lb. Neenah Solar White card stock for all of the stamping and die cutting and I used 110 lb. Neenah for my card bases.  All three cards are A2 sized side folding cards.

This first card is one of my favorites.  I used the Avery Elle Starry Scene stamps and dies to create the starry night sky, the mountains and the trees.  I stamped the sky with Distress Oxide Inks in Peacock Feathers, Evergreen Bough and Chipped Sapphire.  I stamped the little deer and bunny from the My Favorite Things Dashing Deer stamp set and I used the dies from this set to cut them out. All of the images for this card have been colored with Copic markers.

For this second card, I used the Avery Elle PhotoMat die to create the little polaroid element!  I used Distress Oxide Inks in Tumbled Glass, Evergreen Bough, and Twisted Citron to create the color within the polaroid.  The adorable snowman is an image from the Penny Black Christmas Bunch stamp set; how cute is he!  The other die cut pieces were cut from the Lawn Fawn Really Rainbow 6×6 paper pad, as was the card front.  My little snowman was colored with Copics.  I finished all of my stamped images in these two cards with Nuvo Shimmer, Nuvo Glaze, Shimmer Spritz and Nuvo Glitter Accents.

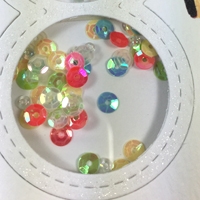
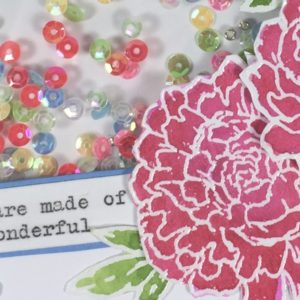
This third and final card was created using the Pink Fresh Fancy Floral 2 die background.  I cut the card front using some glitter card stock from the Brutus Monroe Glitter Stock Sampler 6×6 pack.  This is one of my new favorite supplies.  All the heart eyes for this paper.  I created a shaker element using some Cheery Lynn Acetate (backing my card front) and some Studio Katia Shimmering Ice Fushion sequins.  The Congrats sentiment was created using a Lawn Fawn die and some Tim Holtz Metallic card stock in silver.

I love mixing my card making products to come up with unique designs.  It’s fun to see what you can create with all of these fun supplies!! Make sure you hop over to the Scrapbook Nerd shop to check out the fun card making supplies available.

You can check out my process video on YouTube for all three of these cards!

Thank you so much for stopping by today!

xxMari

Scrapbook Nerd Creative Team Weekly Digest

Hello Nerds!!!

It is finally starting to feel like Fall around here!

This week our Scrapbook Nerd design team has been busy working on bringing you some inspiration.  Let’s see what they have been up to:


Barb has been working with 1Canoe2’s Creekside collection to document one of her travel adventures.   This page shows the versatility of the collection.  Don’t you just love the  soft fussy cut flowers in her background.   Just beautiful, Barb!!!

Gisele is a master of mixing colors and patterns seamlessly together.  This Fall card features the new Simple Stories’s Happy Harvest collection.  That fussy cut fox (from one of the collection’s cut apart card paper) is the star of this layout.  Perfect for the season!!!


This page by Milena is colorful, and the best way to document her 16th year old daughter.   She is our resident sketch maker, and she is using one of her sketches for this page.


All those phrases, and papers  from the Vicki Boutin collection from American Crafts along with some sequin from Studio Katia bring color and fun to this page.


Finally, Nathalie showed us how easily cut files and mixed media can be combined to create a unique background.   She put her own spin on Halloween, and used Distress Oxides and Pink Paislee’s Spellcast collection  to document  her daughter’s costume from a few years ago.  You can check how she created this page on this week’s Nerd Academy Post.

I hope you all are inspired by all this amazing projects.   Remember to check the Scrapbook Nerd store to find all the materials used in these projects, or if you need a especial order brought in.

Have a great week!!!


Nathalie D - designer at scrapbooknerd.com


scxrapbooknerd.com supply list

1Canoe2 Creekside collection and embellishments

Simple Stories Happy Harvest collection

Vicki Boutin Mixed Media collection Paper pad and embellishments

Studio Katia sequin mix

Distress Oxides

Pink Paislee Spellcast collection and embellishments

New Sketch Reveal and a Challenge

Scrapbook Sketches from scrapbooknerd.com

Milena our sketch designer has another fabulous multi-photo layout sketch to share with us.
Remember you can use the sketch as is or you can turn the sketch on its side or change the photo size to suit your needs. Make sure to scroll down to see three different takes on this sketch.

scrapbooknerd.com layout sketch 41

First up, Milena created a fun layout about her daughter. She used the Dream On collection from Pinkfresh Studio. We really love the pop of navy in that collection and the layering that Milena added with pattern papers, puffy stickers and cut apart pieces from the collection.
Live layout by Milena using sketch #41 from scrapbooknerd.com
Next up, Nathalie created a Traveller’s Notebook spread with the sketch in mind. Nathalie flipped the sketch to the left to get a vertical row of photos. You’ll notice she was able to keep some of the layering pieces/embellishments pretty true to the original sketch.
Traveller's Note book page by Nathalie DeSousa
The last take on the sketch is from Joy.
Joy used the main section of the sketch where the photos are to inspire her card. Focusing on one portion of the sketch really helped the idea for this card come to life. The cute little-watercoloured bears are so fun!
Card based on a layout sketch

Thanks for stopping by the SN blog, if you have any questions the team is just a comment away.
We hope you got inspired and join in on the sketch challenge in our Facebook Friends page
You could win a $10.00 gift certificate for linking up your take on the sketch.
Deadline to enter your project is Sept. 30th, 2017.
You could win!
scxrapbooknerd.com supply listMilena’s layout – Pinkfresh Studio – Dream On Collection

Nathalie’s Travellers Notebook page – Fancy Pants – Dream Big collection and
Fancy Pants – Golden Days

Joy’s card – Studio Katia – Kobi Bear stamp & die set, Tim Holtz watercolour paper and
Pinkfresh Studio Indigo Hills pattern paper
ScrapbookNerd.com

Sunday card share #86

Sunday card share #86 – Make Today Amazing

Hey there you,
Thanks for stopping by the SN blog. I’m back with another card share, this week I used all the pretty things…well not really, but I did use pretty papers and die-cuts.

Card Share featuring PinkFresh Studio, Indigo Hills collection

This is one of those cards that just came together quick and easy. I sat down grabbed the 6×6 paper pad from the Pinkfresh Studio Indigo Hills collection along with the die-cut pack and spread everything out on my desk.

I picked three floral papers; cut them into 1″ strips, layered them in a wonky way, then headed to my sewing machine for some stitching then set that aside to work on the card base.
I used an A2 white card base and stamped some pink splatter on the space where the focal image of this card will rest and then I adhered the paper strips.

I layered the five die-cut pieces to create the sentiment cluster you see above. After it was all stuck together I added some foam tape for dimension and stuck it on top of the paper strips.
Easy peasy right? I think I will be using this design again.

I hope you found some inspiration in today’s post.
Happy crafting!

Joy @ scrapbooknerd.com

ScrapbookNerd.com

Sunday card share #85 – You’re awesome

Sunday card share at scrapbooknerd.com

Hey there everyone,
I’m happy to be back sharing another card with you today and as you can probably tell, I’ve been working with Distress Oxide Inks again. I just really like making my own coloured backgrounds.

The colour combination I used for this card is Broken China, Iced Spruce, and Faded Jeans and I thought they would be great for a masculine card.
I used a blending tool to apply the inks to the watercolour paper until I was happy with the look, I then misted the card front with water and dried it with my heat tool. I applied another layer of ink blending and then flicked water onto the panel to get some bigger water marks, I then left it dry. 

I wanted there to be some silver on this card somewhere so I ended up adding some Clear Wink of Stella to the black die-cut star. I punched two circles from some scraps of pattern paper to layer underneath the robot…it really needed another punch of colour.

I used my vintage typewriter for my sentiment, which I found on a search on Google, it’s a favourite go to of mine when I don’t have the right sentiment stamp. I finished off the card with some enamel shapes and a black cardstock A2 size card base.
I refer to this style of card as ‘scrappy cards’ because I use scrapbooking supplies to make them and there is usually no stamping required. I get a bit inky while making the background and I use up embellishments and paper scraps that have been sitting in my stash for a while.

See you next Sunday!

Joy @ scrapbooknerd.com

Products Used:
Broken China Distress Oxide Ink
Iced Spruce Distress Oxide Ink
Faded Jeans Distress Oxide Ink
Crate Paper – Cool Kid Rubber shapes

Black Cardstock
Distress Watercolour Paper
Clear Wink of Stella pen

Paper scraps from the Crate Paper Boys Rule collection
Vintage Typewriter
Enamel Shapes

ScrapbookNerd.com

Sunday Card Share

Sunday card share #78

Sunday card share at scrapbooknerd.com

Hello crafty friends,
Today’s share has a lot of stamping using just one stamp set. The SK Brush Strokes stamp set is very versatile and it’s a great basic stamp set.

Sunday card share - Studio Katia stamps

I started by stamping the brush strokes on a cream background and I used second generation stamping to get a lighter version of each of the colours.
(second generation stamping is simply stamping a second time without reapplying ink after you’ve stamp an image for the first time.)

I used 3 other stamps from the same set with black & tan ink to add the splatter images. I die cut a small tag from some pattern paper for the sentiment from the Dup Talk stamp set. I added some twine to the tag and then adhered it to the card with double-sided foam tape.

I hope you found some inspiration for your cardmaking. Thank you for visiting the SN blog today, happy crafting!Joy @ scrapbooknerd.com

https://static.inlinkz.com/ppr.js

ScrapbookNerd.com

Sunday Card Share

Sunday card share #74

Sunday card share at scrapbooknerd.com

Hello crafty friends,
Sometimes I’m a bit behind on trying out new trends and that was true for the all of those sequins out there. I jumped in and I bought a few bags of Studio Katia sequins several weeks ago and I’ve been enjoying using them as embellishments and in some shaker cards.

Sunday Card Share - Shaker card with Studio Katia sequins and stitched circle die.

I used some watercolour paper for a bit of added texture and cut the Stitched Loops towards the left side of the cardstock panel. I used some double-sided foam tape on the back of the panel and in-between the circles to create the space to contain the sequins behind each circle.

Sunday Card Share

After adding the sequins and some seed beads I simply covered the back with a scrap piece of white cardstock, stamped the sentiment and then adhered the panel to the front of an A2 white card base (4 1/4″ x 5 1/2″).

Thank you for stopping by the SN blog, I hope you got inspired.
Happy crafting!

Joy @ scrapbooknerd.com

https://static.inlinkz.com/ppr.js

ScrapbookNerd.com

Sunday card share @scrapbooknerd.com

Sunday card share #73

Sunday card share at scrapbooknerd.com

Hello my friends,
I’ve really been enjoying water colouring and the new products from Studio Katia over the past few weeks. The SK sequins are great for embellishing and for making shaker cards.
Today’s share has me thinking of Spring with the beautiful flowers and the colours I used. The sequins were my inspiration.

Sunday card share @scrapbooknerd.com - featuring Studio Katia stamps & Sequins

I heat embossed the flowers and leaves on watercolour paper for easy colouring, the raised edges of the embossing powder helps keep the water contained inside the image. After they had dried I fussy them each image and added double-sided foam tape to the back of the centre flower.

The sentiment on my card today was typed up on my vintage typewriter.

Sunday card share @scrapbooknerd.com

If you’ve created a shaker card I would love to see it, consider sharing it with me on the
SN Friends group on Facebook.

Thanks for stopping by the SN blog today. Happy Sunday!

Joy @ scrapbooknerd.com

https://static.inlinkz.com/ppr.jsScrapbookNerd.com

Sunday card share #67

Sunday card share at scrapbooknerd.com

Welcome!
Have you ever created a project from leftovers?

The card I’m sharing today started with things I had sitting on my desk from other projects that didn’t make the cut then but were still really great for other projects.
I had two pieces of paper, on one I had stamped an image on some woodgrain paper and the other was a foiled a piece of white cardstock. Those two papers became the layers on this card.

Sunday Card Share at scrapbooknerd.com - So Very Blessed stamp set by Neat & Tangled

Now because most of this card was complete because of the papers I found on my desk, the rest of it came together quickly.

I heat embossed the So Very Blessed image using Versa Mark ink and black embossing powder and trimmed down the paper to fit on top of the foiled cardstock. All that was left after that was adhering everything to the card base.

It’s great when a project comes together organically like today’s card, it doesn’t happen often for me. I will continue keeping those leftover or used papers and see if I can make some more cards or other projects.

Thank you for visiting the SN blog today.
Happy Sunday!


Joy @ scrapbooknerd.com

https://static.inlinkz.com/ppr.js

ScrapbookNerd.com

Sunday card share #66

Sunday card share at scrapbooknerd.com

Happy Sunday everyone,
It’s Joy here with another card share and today’s share uses distress inks to create a blended background. Whenever I use distress ink in this way I always like the results and, I like to use some water for that splatter effect you see.
Sunday Card Share at scrapbooknerd.com - Hello There stamp set by Avery Elle

I used the same distress ink, Salty Ocean, to watercolour the bear’s hat and scarf after stamping the image with Archival Ink.  Now because I was colouring directly on my card base this time I kept my water brush from getting too wet by dabbing off on some paper towel. This helped me to prevent the card base from warping.

My final step was to heat emboss the Hello sentiment using some black Zing! embossing powder, I love the look of the embossed sentiment. In real life, it’s got a shine to it and just pops off the card.

Thank you for visiting the SN blog today, I hope you found some inspiration.

Joy @ scrapbooknerd.com 

https://static.inlinkz.com/ppr.js

ScrapbookNerd.com