Category Archives: Product Information

Layering chipboard pieces without adding bulk

Hello  friends!

Hope you are ready to start a new month!   It seems like this year is flying by, and now we are ready to put the winter gear away, and start to see how Spring starts to pop around us.

Today, I want to bring you a new layout that is fun, and colorful, but also showcases dimension without adding undesired bulk to the page.


The new Crate Paper’s Good Vibes collection is filled with vibrancy,  color, and texture, so I wanted to take advantage of these to create a page that also creates the illusion of dimension without adding the bulk to the page.   The following video will show you a few tricks when combining chipboard pieces so that they don’t add undesired bulk to the page:


As you just saw in the video,   the key to creating this page is to trim the chipboard at so that they create the illusion of an intersection while adding dimension to the page.


Once the chipboard frames were trimmed, the layout came together in a small amount of time.    A bit of mixed media just peeking behind the frames is enough to bring more color and interest to the page.


The beautiful embellishments and fun phrases were perfect to complete this page!   The intersected frames not only create the background but also create dimension to the page with just a few tricks.

As always do not hesitate to contact me if you have further questions on the page.  Remember to stop by the Scrapbook Nerd online store to pick all the materials used on this page, and lots of new collections being added daily!

Take care!


Nathalie D - designer at scrapbooknerd.com


Cardstock – Bazzill,  Marshmallow

Patterned Paper – Crate Paper – Good VIbes collection ( individual  papers and 6×6 paper pad)

Embellishments  – Crate Paper – Good Vibes collection – chipboard stickers, cardstock stickers,  pom pom frames,  puffy foam word stickers

Inks – Ranger – Distress Oxides in Fossilized Amber, Peacock Feather, Worn Lipstick, Abandoned coral, Cracked Pistachio,  Blueprint;  Distress Ink in Fire Red Brick

Mist – Heidi Swapp – colorshine in Gold LameScrapbookNerd.com

Silhouette Savvy Series: Welding Cut Files

Tutorials and creative tips


Hi there!

Hope you are doing well!

We are heading into February (time is flying!), and that means “Valentine’s day”.    The store will be releasing a few free cut files, this month.  The Love Story cut file is available now and the rest will follow on Feb, 1st.

I wanted to show you an easy way to manipulate the cut file to create a one-of-a-kind cut out by welding some of the cut file images.  So sit back, and take notes on how to weld cut file images together:


Here is a small cheat sheet on the steps to follow:

  • Open and trace each of the images you will be using.  Make sure that the image is converted into a Compound Path (highlight the entire image -only what will be used in the cut out-, right click on the mouse, and chose “Make Compound Path”
  • Move the image so that it is intersecting?touching the other image/images that it will be welded to
  • Highlight the all the images to be weld, right click the mouse, and chose “Weld”  or chose the Modify window, and click on the “Weld”comand.

It is that simple!  Two things to  remember are:

  1. Make sure you are only selecting the image that you will be welding together  ( you can always get rid of any extra images by releasing the path, and then deleting any unwanted pieces.  Don’t forget to convert the  cleaned image back to a Compound path).
  2. The images being welded have to intersect/touch for this comand to function correctly


Now let me show you how this page came together using the cut out created in the previous video, a bit of mixed media, and the beautiful “ROMANCE” collection from Simple Stories. SO  sit and enjoy the nex few minutes:


As you see, I used a bit of watercolor and Yupo transluscent paper to create my own marble paper to back the cut file.


All the embellishments from the “Romance” collection complement the picture of my husband and I while watching tv.


I hope this inspires you to bring out your Silhouette machines, and create a one-of-a-kind cut out by simply welding some images together.

Let me know if you have questions about how this came together.

Take care!

Nathalie D - designer at scrapbooknerd.com

Yupo Transluscent watercolor paper pad

Prima Marketing watercolor palettes – The Classics, The Tropicals, Pastel Dreams, and Odyssey

Simple Stories  – Romance collection – kit

, stickers, chipboard stickers, die cut pieces

Simple Stories – High Style paper pad

Free Love Story cut file at scrapbooknerd.com

ScrapbookNerd.com

Using Mixed Media to Mute your Backgrounds


Hi there!


Hope you all had a blessed and peaceful Christmas!  Now, we start the countdown to the end of the year.  Wow, time has flown by!

Today, I wanted to share with you a small idea on how to mute busy backgrounds using a bit of mixed media.  I found it that many times I love the patterned paper i  want to use as a background, but it becomes too busy when I start adding on to it.  One of my solutions for this is to mute the background using gesso or white acrylic paste.  The following video will show you how I go about it.


As you saw in the video,  backgrounds can easily be muted/toned down by adding a bit of mixed media to it.  In this particular page, white acrylic paint was used for this, however white gesso will also work to create a very similar result.


The key for this technique is to use an acrylic paint brush.   These types of brushes have a harder/sturdier bristle (either plastic or nylon) which helps when stippling/stretching the paint on the page.


A dry brush was used to spread a very little amount of paint on the background sparingly.   Though it seems the paint covers the background, once it dries it becomes translucent, hence toning down the intensity of the background.


The background paper from the Winter Meadow collection from Photoplay is quite busy, but the technique makes it possible to add a cut out  -created with a Just Nick Studio cutfile- seamlessly.


Once the cut out is put in place, the page comes together easily by adding some embellishments from the collection, as well as Crate Paper’s Snow and Cocoa collection.   Here is the completed layout:


This technique will easily let you use those busy background papers  seamlessly in your next layout.   Remember to check the Scrapbook Nerd store for all the materials used in this page.   There are so many new things arriving at the store.

Let me know if you have questions on how this came together,  I would love to   help you!


Have a Happy New Year!


Nathalie D - designer at scrapbooknerd.com


Photoplay – Winter Meadow collection – 12×12 kit

Photoplay – WInter Meadow collection – ephemera pack


Paige’s May Friday Recap


Hello All!

I hope that you have enjoyed a lovely week.

This week, I have share a variety of different collections in my layouts. Most of these were created at the Scrapbook Nerd iNSD event earlier this month.

  1. Turkey: profiling the first time my husband tried turkey hunting last month, I used papers and embellishments from Pink Paislee’s “Outfitters” collection.
  2. Best Friends: I enjoyed using this star cut file and the amazing papers from Fancy Pant’s Family & Co. collection to document the sweet relationship that has developed between my son and our new puppy.
  3. Live More: As explained in the tutorial post earlier this week, in this layout, I wanted to tell a story about how I have tried to keep my spirits up through an injury/surgery/absence from work. This beautiful collection from Pinkfresh Studio had the perfect background paper, but after adding the photo and some embellishments, I didn’t have enough room for the journalling. I explain how I created a pocket on the back for hidden journalling on a tag.
  4. Fearless Keeper: The Simple Stories – Simple Soccer Set was perfect for telling the story of my youngest son who plays goal keeper for his soccer team.
  5. We are Family: I was keen to use more of the Family & Co. collection, as well as a set of gelatos (that I won at the crop) that matched the colours perfectly. I made four little clusters using papers and die cuts/tags from the collection with some colour from the gelatos in behind.
    Hoping that all of you are finding time for your creative pursuits even as the nicer weather takes us outside!Paige @ scrapbooknerd.com

    https://static.inlinkz.com/ppr.js

    ScrapbookNerd.com Canadian online paper craft supply store

Sunday card share - Deco Foil Transfer Gel

Sunday card share #80 – Deco Foil Transfer gel

Sunday card share at scrapbooknerd.com

Happy Sunday!
Today’s share is all about foiling mixed with some product information. If you’ve followed us for a while, you’ll know the Nerds love Deco Foil. 😀

Thermoweb released a new product call Transfer Gel and it recently hit our shelves and my crafting desk,  I’ve created a video and a few cards to share how the Transfer Gel works and you can see a list of my supplies at the bottom of this post.

Here’s a closer look at the cards I created. Card Share - Deco Foil Transfer Gel - Happy Birthday card

Happy Birthday card with Deco Foil Transfer Gel

Thinking of you card with Deco Foil Transfer Gel

Thinking of you card with Deco Foil Transfer Gel

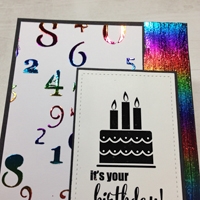
It's Your Bithday card with Deco Foil Transfer Gel

If you have any questions about the Deco Foil Transfer Gel or the projects created, please comment on this post and we will be happy to help.

Happy crafting!

Joy @ scrapbooknerd.com

https://static.inlinkz.com/ppr.js
ScrapbookNerd.com

A mini-album with tags, flaps and pull-outs!

Paige @ scrapbooknerd.com

I’m so happy that spring is here finally, despite the rainy days. With spring, I have been enjoying using collections with lovely spring colours and icons. Hazelwood by OneCanoeTwo fits the bill and even after using it on many layouts, I still had a lot of papers and embellishments to work with.

I hadn’t done a mini-album in quite a long time and thought it would make a nice gift for my sister. I asked her to send me photos of things she is grateful for. Luckily for me, she also decided to send me some journalling for each photo. There were both landscape and portrait photos, so I cropped most of them into 4×4 photos. That helped me decide to make the album 6×6.

Inside cover: Celebrate this lovely life.

I cut six papers at 6×12 for the inside pages and scored at 1″, 6″ and 11″, and folded each paper in half. For the outside cover, again cut at 6×12, I scored at 5″, 6″ and 7″, and folded at the 6″ mark. So that each of the inside papers were just slightly smaller than the cover, I trimmed each by 1/8″.

I decided on the order of the pages and then lined up the scored 1″ parts within the spine of the cover. Once they were all lined up, I punched three holes through all the papers. I chose a ribbon and placed the ends down through the two outer holes and up through the middle one, tying a bow.

I wanted to use a lot of tags in this album, to hold the journalling, additional photos, or embellishments. On most pages, I used the photos as pockets to tuck tags in behind.

tucking in tags

hidden journalling on tags

Also, while I sealed the bottom of the pages, I left the tops open. This allowed me to create inserts which hold additional photos. I really enjoyed pairing current photos with much older ones to show how my sister’s family had changed, but not changed all that much.

Traditions through the years

A family that travels together

I made different types of flaps/pull up for the inserts. For this one, the flap covered most of the photo and allowed for a lot of embellishment and then lifted to reveal both the photo and journalling as well as lifting up to another photo.

right side, flap insert


flap lifted

insert pulled out

I like that I was able to start the album with my sister and her husband early in their marriage, and end it with him more recently, going to the top of a mountain top for her.

a true love story

This was such an easy collection to use for this project, as everything coordinates but also allows for a diversity of colours and photo types.

Do you enjoy creating min-albums?

ScrapbookNerd.com Canadian online paper craft supply store


https://static.inlinkz.com/ppr.js

Nathalie’s April Review

Creative Team @ scrapbooknerd.com

Hello everyone!

Spring is in full swing!, and i was inspired in the change of season (colors are starting to show, flowers are blooming, weather is warming up, and no more boots! -at least in my part of Canada-) to create colorful projects for my reveal week, this month.  Here is a review of what i was inspired to create:

  • PERFECT SMILE –  The beautiful triangle pattern in the Joy Parade collection -by Fancy Pants Designs- was the starting point for this layout.   The inky background, and the color combination were just a welcome compliment to a super fun picture of some of my family.


  • SPLASH –  Blog Post tutorial on Distress Oxides –   I love playing with different mediums to create backgrounds for my projects.  This time, I chose to use the new Ranger’s Distress Oxides to create the illusion of splashing water in a layout.  In case you missed it, there is a small video that shows how the background was created (just go to the previous post)


  • LOVE WHAT YOU DO –  For this layout, i chose a large hand stitched title, the new distress oxides, embellishments from Simple Stories Faith collection, and  papers from Echo Park’s Just Be You collection to document one of my favorite hobbies -photography-.


  • AMAZING –  In case you have never seen pictures of my family, we are in love with our 3rd baby, a 6 yr old Boston Terrier named Poochie.   Once I saw the doggie die cut piece in the Chit Chat Chowder collection by Jillibean Soup, I knew that i would be coming home to my desk.  Here is one of the layouts, I have created with this collection (and in case you have extra doggie die cut pieces you are not using,  I would love to add them to my stash!!!)


I really hope that this array of colors, textures and designs inspire you to visit the Scrapbook Nerd  store to check all the new collections that are always being added to their shelves.  Don’t hesitate to contact me if you have any questions on how any of these came together.

Keep on Craftin’!!


Nathalie @ scrapbooknerd.com

https://static.inlinkz.com/ppr.js


ScrapbookNerd.com Canadian online paper craft supply store

Nathalie’s Friday Recap


Hello there!

First of all let me wish you all a Happy New Year!   May 2017 be filled with love, happiness, health, and lots of crafty time!

For this month’s projects, I chose to work with different techniques, media, and collections.   All the pretty patterned papers, and cut files are what inspired me to  create backgrounds where i can preserve my memories.   Here is a recap of all this month’s projects:

  • DREAM GIRL  –   This project combines some mixed media, a cut file ( The Cut Shoppe’s  Happy Clouds cut file), and the beautiful Crate Paper’s Cute Girl collection to document a sweet moment between my niece and our baby when they were both just toddlers.


  • ‘TIS THE SEASON TO SPARKLE  –  Silhouette Savvy Series tutorial blog post –  For this month’s entry to  the Silhouette Savvy series, I created a small tutorial showing  how to use the Silhouette  Cameo to create a stand-out title.    The title, along with Pinkfresh Studio’s “Oh Joy” collection were perfect to document  my favorite Christmas picture.


  • HAPPY NEW YEAR TO YOU.   Life is about little moments, and i was able to capture one of them while trying to get a picture of the 4 cousins.   For this projects, I chose to create a watercolor background, and use Simple Stories’ ‘Whatever” collection to   create a large title using the new Happy 2017  cut file, available for free at Scrapbook Nerd’s  store.


  • AMAZING & TIMELESS.   This project changed direction as it was being created. but the end result is just perfect.  Once again, I chose a cut file form The Cut Shoppe and watercolors to bring the background to live.  A few fussy cut flowers, and  embelishments from Pink Paislee’s Take me Away and Moonstruck collections.


I hope this projects inspire you to get creative with memory documenting.   Remember to always put a little piece of you in each project you create.

If you have any questions on how any of these came together, please do not hesitate to contact  me.

Thanks for visiting, today!


Nathalie @ scrapbooknerd.com


!– inlinkz code start –>

Nathalie’s Friday Share.

Creative-Team-projects-at-scrapbooknerd.com_-600x225


Hello, and welcome to this week’s project share!!

It has been a lot of fun sharing my projects with you all this week; here is a recap of all the projects:

  •  HELLO LIFE

This layout used Simple Stories’ Sunshine and Happiness collection to document my daughter’s first zip-lining adventure.

HELLO LIFE - @scrapbookNerd.com -


  • CREATE

This layout was created as a sample for the SIlhouette Savvy series (Tuesday Tutorial),

CREATE - Silhouette Savvy tutorial @ScrapbookNerd.com

the completed layout


  • THESE BOYS RULE

This layout documents my son’s adventures at his 9 grade retreat.  It is inspired on his ideas and stories.

THESE BOYS RULE - @ScrapbookNerd.com -


  • READING QUEEN

I wanted to capture and document my niece’s passion for reading, and climbing to the top bunk of my son’s bed.  So I created a stack of books using Crate Paper’s Bloom Collection.

READING QUEEN - @ScrapbookNerd.com -


I hope this serve as inspiration for your own projects.

As always, feel free to contact me if you have any questions about any of the projects, or just to say Hello!.

Till next time,

Happy Crafting!!

Nathalie @ scrapbooknerd.com

ScrapbookNerd.com Canadian online paper craft supply store