Tag Archives: Deco foil

Cardmaking with Foil Mates by Gina K

Sunday Card Share #81 – Gina K Foil Mates

Sunday card share at scrapbooknerd.com

Welcome back, It’s Joy here today for the SN card share.
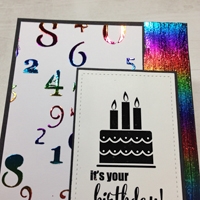
I love adding foil to my projects and while we were at CHA back in January we were able to see Gina K work with her new products with Deco Foil. Gina’s collection has Fancy foils, foils that match the ink and paper in her collection, cardstock, ink cubes Foil Mates, metal dies, and ribbon. You can see the full collection here.
Cardmaking with Foil Mates by Gina K

This card started with a scrap of pattern paper on my desk and that lead me to the colours of distress I used for the watercolour background I created. I believe most people call the technique I used for the background is the packaging technique or the smooshing technique.

You simply use some packaging or small plastic baggie and apply your colour medium to the plastic, add a bit of water then flip it over onto your paper and move the colour around.

Cardmaking with Foil Mates by Gina K

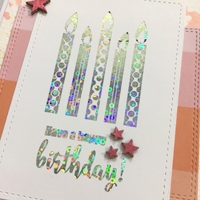
I used two different Gina K. Designs die sets to cut the sentiment and the pattern paper. I love that stitching detail, especially the double stitched set.

Next, I used a laminating machine to added some Silver Sequin foil to the Foil Mates Birthday sentiment. I also added foil to some wood veneer stars using the Deco Foil Liquid adhesive.
I used my fingers to apply the glue to the stars, waited for them to dry & become tacky and rubbed the foil on top. Due to the uneven surface of the wood veneers, I did have to reapply the foil in some spots. 
Foiling with Deco Foil

All I had to do after that was to glue everything down and my card was finished.
I hope you found some inspiration today and I hope you get out your foils and add some shine to your next project. Happy crafting!

Joy @ scrapbooknerd.com

https://static.inlinkz.com/ppr.js

ScrapbookNerd.com

Sunday card share - Deco Foil Transfer Gel

Sunday card share #80 – Deco Foil Transfer gel

Sunday card share at scrapbooknerd.com

Happy Sunday!
Today’s share is all about foiling mixed with some product information. If you’ve followed us for a while, you’ll know the Nerds love Deco Foil. 😀

Thermoweb released a new product call Transfer Gel and it recently hit our shelves and my crafting desk,  I’ve created a video and a few cards to share how the Transfer Gel works and you can see a list of my supplies at the bottom of this post.

Here’s a closer look at the cards I created. Card Share - Deco Foil Transfer Gel - Happy Birthday card

Happy Birthday card with Deco Foil Transfer Gel

Thinking of you card with Deco Foil Transfer Gel

Thinking of you card with Deco Foil Transfer Gel

It's Your Bithday card with Deco Foil Transfer Gel

If you have any questions about the Deco Foil Transfer Gel or the projects created, please comment on this post and we will be happy to help.

Happy crafting!

Joy @ scrapbooknerd.com

https://static.inlinkz.com/ppr.js
ScrapbookNerd.com

Foiling, happy birthday card

Sunday card share #75

Sunday card share at scrapbooknerd.com

Hello SN friends,
I’ve got some masculine inspiration for you today using some Therm-o-web Deco Foil.
I die-cut the start from some Toner Paper so I could add foil to the top using a laminator machine.

Sunday card share - Deco Foil, stars, masculine birthday card

The stars were cut again out of some black cardstock so I could use the leftover/negative piece leftover. I stamped the panel with a background stamp before backing it with blue cardstock.  I glued the foiled stars back into their spots and then glue the sentiment in the bottom right.
Foiling, happy birthday card, deco foil

The foiled stars are not perfectly covered in foil, I like that somewhat distressed look.
I hope this inspired to a little today, thank you for stopping by the SN blog.
If you have any questions please let me know in your comment.

Joy @ scrapbooknerd.com

ScrapbookNerd.com

Sunday card share #60 remix

Sunday card share at scrapbooknerd.com

Welcome!
Today’s card share has been remixed for our Countdown to Christmas series. The creative team is sharing holiday inspired projects until the end of the month and this post is packed with holiday cards.

ctc-nov-20aAll my cards today feature Prima Marketing adhesive rub-ons & Deco Foil. After my last card share we got some questions on how I used the negative/leftover image from a rub-on to create another project. I share more of that process below.

This first card uses a foiled focal image and a heat embossed background. Simple and interesting with the extra details.
ctc-nov-20b

  1. After creating the first card I was left with the fabulous negative image you see below.
  2. Using a piece of double-sided tape, I burnished on the image.
  3. The adhesive now holds the foil and is sticky in the middle where there is no foil.
  4. I adhered the image to some white cardstock and removed the top layer on the foil to expose the adhesive.
    ctc-nov-20c
    5. I place some silver foil over top of the image, rub it with my fingers then removed the extra silver foil to reveal the final snowflake image.
    ctc-nov-20e
    Here is card #2
    Sunday card share - Deco foil Christmas card with Prima adhesive rub-ons
    I repeated the same process to make the foiled image for card #3
    Sunday card share - Deco foil Christmas card with Prima adhesive rub-ons Sunday card share - Deco foil Christmas card with Prima adhesive rub-onsI hope you are enjoying the holiday project posts and that you find some inspiration for your own projects. If you would like to share what you have created, we’d love it if you post a photo on Scrapbook Nerds Friends & Fan Facebook page.Take care!
    Joy @ scrapbooknerd.com

https://static.inlinkz.com/ppr.jsScrapbookNerd.com

Sunday card share #59

Sunday card share at scrapbooknerd.com

Today is kind of a special day here on the SN blog, we’re starting a new series this month called Countdown to Christmas. This in an annual feature here and the Nerd Girls will be sharing their holiday inspired projects until November 30th, so check back often.
countdown-to-christmas2016
It’s no secret that we love foiling products from Deco Foil here at Scrapbook Nerd and this holiday season Prima Marketing has released some amazing adhesive rub-ons that are made for foiling. (You can see a list of my supplies at the bottom of this post)
Christmas card using Deco Foil & Adhesive Rub-Ons by Prima Marketing
I think these rub-ons make it easy for anyone to get great results and you don’t need any machines to help you. After transferring the rub-on to your project, cover the image with your selected foil (good side up), then you rub/burnish the foil with your fingers to make it stick to the rub-on. It’s really that easy!

The word hope was added on top of the gold foil using the rub-on word set. Layering different colours of foil is a fun way to add some detail to your project. Christmas card using Deco Foil & Adhesive Rub-Ons by Prima Marketing

It’s difficult to photograph the foil to really show how amazing it looks when you are finished.Christmas card using Deco Foil & Adhesive Rub-Ons by Prima MarketingAnother fun thing you can do is to use the remaining NEGATIVE image to create another project. I made sure that the gold foil from my first card was neatly cut before starting so I would be able to make this second card.
I used an adhesive sheet, rubbed the negative image on, then removed top clear plastic film from the gold foil to expose the adhesive and then added the black foil to that adhesive area. 
Christmas card using Deco Foil & Adhesive Rub-Ons by Prima Marketing

After burnishing the black foil I removed the clear plastic film for the big reveal.
Two projects from one rub-on.

I could have continued and used the next negative image to create a third card if I wanted to but I decided to stop there.Christmas card using Deco Foil & Adhesive Rub-Ons by Prima Marketing

I hope you enjoy this holiday series and find some inspiration for your own holiday projects this year. 🙂  If you have any questions let me know in your comments.
Happy crafting!

Joy @ scrapbooknerd.com

https://static.inlinkz.com/ppr.js

ScrapbookNerd.com

Sunday card share #49

Sunday card share at scrapbooknerd.com

Hello friends,

I have a couple of cards to share with you today. I had my Deco Foil foiling supplies out this week from another project so I decided to add some foil to my cards too.

Happy Birthday Card, scrapbooknerd.com Sunday Card Share
I wanted to use the full sheet of banner paper from the Maggie Holmes Bloom 6×6 paper pad, so I made these odd sized cards, both are 3″x6″. I used the Deco Foil foam adhesive sheet with some word dies for the sentiments, after die cutting them I added the pink foil.
The birthday stamp is from an old Hero Arts stamp set called – It’s Your Day. I added some black ink to the edge of the card to define the edges.
Happy Birthday Card, scrapbooknerd.com Sunday Card Share

This next card uses the same banner paper and a ‘happy’ word die from Technique Tuesday. Just like the last card I added the foil after I die-cut the word. I mounted the word on some pop dots and cut out a circle shape as the focal point.

Happy Birthday Card, scrapbooknerd.com Sunday Card Share

I added some embroidery thread behind the circle for some added texture after stamping the word birthday. I also added some black ink to the edges of the circle to make it stand out from the background a little bit more.Happy Birthday Card, scrapbooknerd.com Sunday Card Share

Both of the foiled pieces were made without the use of a laminator or Minc machine, so if you don’t own one you can make these cards too. You simply need the foil and some of the foam adhesive.

I hope you got inspired and try out some foiling on your next project.
Joy @ scrapbooknerd.com

https://static.inlinkz.com/ppr.js

P.S. If you want to see some more foiling ideas, check out the video below.

ScrapbookNerd.com Canadian online paper craft supply store

Sunday card share #46

Sunday card share at scrapbooknerd.com

Welcome to another Sunday card share,
I was introduced to Christmas is July years ago online and since then I make several Christmas cards throughout the month. I usually end up using one of those card designs for my Christmas cards in December.

Sunday card share @ scrapbooknerd.com
I stared with the tree die cut and decided to add some foiling, then more foiling and more foiling. 😀 I may have gotten a little carried away but I do really like the way this card turned out.

Sunday Card Share @ scrapbooknerd.com

The plain white background let’s the foiling stand out and I think this design will be good for bulk card production later this year when I make my all my Christmas cards.

Thank you for stopping by, I hope you got inspired.
Joy @ scrapbooknerd.com

https://static.inlinkz.com/ppr.js

ScrapbookNerd.com

Crazy Love – Dimensional Title tutorial

Hello Nerds!

I hope you all are enjoying the beautiful weather, and getting lots of crafting done.

This month, I was inspired to create using lots of white space, and focusing on the picture.  Since I wanted the titles to stand out on my white layouts (since most of them were made on white cardstock),  i used dimension and a hint of color to make them pop on the layout.   Here is how i went about creating my titles.

  • I used a cut file (Ashley Horton’s design) to create my title.  I cut 4 titles (with the same dimensions) on white cardstock using my Silhouette Cameo.   Note:   you can create this look using regular letters or alphas, as long as they are not thick -since they will be layered-.


CRAZY LOVE -title tutorial-

this is the original cut-out

  • Using the new Heidi Swapp MInc reactive mist, i covered one of  the cut-outs and set it aside to fully dry.  This step applies also to thickers or cut-out alphas.
  • While the mist dried, I attached two of the cut-outs together,  making sure that they sat flush together.  I tried to keep them as clean as possible as this piece will be the upper part of the title.  I set it aside to  ensure the glue dried completely.

CRAZY LOVE -title tutorial--2


  • I used the Heidi Swapp’s Foil on top of the reactive ink misted cut-out, and proceeded to put it through the laminator to completely set the foil onto the piece.  If you are using the MInc  machine, set the temperature to 3,  for any other laminator please check your manual for the right heat setting.  This step also applies if you are using alphas or thickers.


CRAZY LOVE -title tutorial--4

I chose this distressed look for the foil as it works with the layout; however if you want full coverage of the piece, i would suggest you use the Ink toner marker to color the piece before foiling


  • I glued the last cut-out to the newly foiled piece,  making sure that the  foiled side was facing up, and the two cut-outs sit flushed on top of each other.  I set it aside to make sure they dried completely.

CRAZY LOVE -title tutorial--5


  • The final step is to attach the white cut-out pieces to the foiled pieces making sure that there is an overlap on the pieces. In my case,  a small portion of the foiled cut-outs show under the white cut-outs -it looks like a shadow, or 3D piece-.  You can do the same if you are using alphas or thickers.   Make sure that you use strong glue, and leave it to dry completely before attaching it to your project.

CRAZY LOVE -title tutorial--6


  • If you don’t own a laminator,  the same look can be achieved by using the same cut-out but in different colours or textures.
  • I would suggest you used strong adhesive or a hot glue gun to attach the title to your project, as the layers do add weight -that could rip the layout’s mat-.  Here is how this title looks once attached to the layout.


Crazy love -tutorial- @scrapbooknerd.com

The small overlap of the white pieces on top of the foiled ones, give this title the look of graffiti on a wall, and helps to make it stand out on the layout.


I hope you try this idea on your titles or cut-out pieces on your projects.  It is not necessary to use foil pieces (I happen to love my MInc machine), just to create contrast and the overlap.  Here is  the final layout:


CRAZY LOVE @scrpbooknerd.com

The title stands out on the busy background.


As always let me know if you have any questions about this tutorial.

Till next time,

Happy Crafting!!!


Nathalie @ scrapbooknerd.com

ScrapbookNerd.com Canadian online paper craft supply store