Tag Archives: Sunday Card Share

shaker card

Sunday card share #77

Sunday card share at scrapbooknerd.com

Hello crafty friends,
Shaker cards are a fun way to create an interactive element for the recipient of your
handmade card creations.

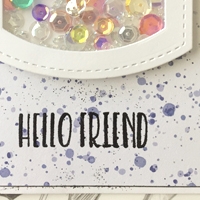
Today’s share is a simple shaker with a pattern paper background. The shaker element was created using the Studio Katia Stitched Nested Squares die, white cardstock and double-foam tape.

Sunday Card share - shaker card, sequins and Studio Katia stamps & dies

Studio Katia sequins & seed beads were added to the inside of the shaker element and then white cardstock was added to the back to keep the contents enclosed.

The splatter pattern paper is from the Indigo Blue collection from Pinkfresh Studio and I  adhered it to the white card base. The last step was to stamp the greeting with some Archival black ink.

A list of products used to create this card is at the bottom of this post. shaker card

Thank you for stopping by the SN blog today. Happy crafting!

Joy @ scrapbooknerd.com

https://static.inlinkz.com/ppr.js

ScrapbookNerd.com

Sunday Card Share #63

Sunday card share at scrapbooknerd.com


Hello Nerdy friends!
I hope you all are doing well, and getting ready to enjoy the upcoming holidays.

Trust me December is a month full of celebrations in our household, not only do we have Christmas, and New Year’s, but also four birthdays in between.  With all the time being used on preparation for the holidays, I sometimes leave the birthday cards to the last minute.  So i thought I will share with you a quick card that i made last week for my soccer-niece.

  • My favorite thing to use (when making quick cards) is  my Silhouette cameo.  For this card, i used one of the Silhouette files to create the cut out of this 5×5 in card on  Grapefruit color card stock.

  • While the machine was cutting the image, I pulled glitter paper from my stash and cut a 5×5 in square.   I also cut some smooth white card stock to create the base of  the card ( I made sure the card front could fit to the 5×5 in cut out.

  • I lined up the two pieces of paper, and punched two parallel holes  along the upper side of the square.  Then using foam dots, I attached the cut-out to the glitter paper ( i  like the  cut out shadow that this space creates on the glitter paper).

  • A small piece of ribbon, about 10-12 in, was thread through the holes punched on the card front, and tied to create a bow at the top of the card.

  • Before finishing the card, I used my We R Memory keepers envelope and bow puncher to create a envelope for the card.

  • After making sure the card fit in the envelope, I simply glued a small wood veneer word (this serves as my card’s sentiment) onto the bottom corner of the card front.  Here is the finished card:

The process of creating this card took very little time, and I love the simplicity of the card.  My little niece loved the card, too. So if you are pressed for time, using a die cutting machine can help you create cards  in   no time.

As always let me know if you have any questions about how this came together.

See you all soon!Nathalie @ scrapbooknerd.com

https://static.inlinkz.com/ppr.js
ScrapbookNerd.com Canadian online paper craft supply store

Sunday card share #52

Sunday card share at scrapbooknerd.com
Happy Sunday!
It’s Joy here with our card share this week. I believe that scrapbookers have all the supplies needed to create beautiful homemade cards to share with family & friends. Spread a little happiness and make a few cards this week to send out. 🙂

These cards focus on using up some leftover supplies from the My Mind’s Eye –
On Trend 2 collection.

Sunday Card Share - MME On Trend 2 collection @scrapbooknerd.comI used the same supplies in last weeks card share post Sunday card share #51 and I was able to make 9 cards and one layout. I focused on the cut-apart sheet and used the 3×4, 4×4 & 4×6 cards as the focal images on each card. The foiling on the Little Things paper is beautiful.

Sunday Card Share - MME On Trend 2 collection @scrapbooknerd.comI added an older pinwheel from Crate Paper to the Hooray card from my stash, the gold detail worked so well. I also added the cut off toothpick as a little detail.Sunday Card Share - MME On Trend 2 collection @scrapbooknerd.com

Do you have photo corners in your stash?
I have a package of craft coloured ones that I break out every now and then and I think they work really well with this collection.
Sunday Card Share - MME On Trend 2 collection @scrapbooknerd.com
Well crafty friends, I hope you got inspired and will try making some cards and send out a little happiness this week. See you next time.

https://static.inlinkz.com/ppr.js

ScrapbookNerd.com Canadian online paper craft supply store

Sunday Card share #50 – Special Share & Win! post

Sunday card share at scrapbooknerd.com

Welcome to a special Sunday card share everyone,
Today marks the fiftieth post in our SCS series, that’s almost a full year of shares!
We hope you’ve enjoyed all the card ideas and inspiration.

To celebrate this milestone post, we are offering you a chance to win a scrapbooknerd.com
20$ gift certificate. All you need to do to enter is to link your new card creation at the bottom of this post then share your card on your own Instagram or Facebook page. That’s it!

A winner will be chosen Sunday September 11, 2016 at 11:59pm EST and the winner will be emailed their certificate code directly. We can’t wait to see what you make 😀
Share & win with scrapbooknerd.com
I wanted to create today’s card with a lot of layers, so I chose five papers from the Maggie Holmes Bloom 6×6 paper pad. One of the things I love about working within one collection is that I don’t have to worry about the papers coordinating, that’s all been taken care of.

Sunday Card share #50 - Share & Win at scrapbooknerd.com

Using some of the puffy stickers from the same collection, I added the hello sticker and the dear. At that point the card was looking a bit washed so I added some gesso to the bow paper and added a little pink gelato with some water. That wasn’t enough for my liking so I mounted the bottom layers to black cardstock and outlined the paper pieces. the last thing I added before adhering the layers was some black india ink splatters.

Sunday Card share #50 - Share & Win at scrapbooknerd.com

Now it’s your turn! Link up your card using the InLinkz below.

Joy @ scrapbooknerd.com

https://static.inlinkz.com/ppr.js

https://static.inlinkz.com/cs2.js

ScrapbookNerd.com Canadian online paper craft supply store

Sunday card share #48

Sunday card share at scrapbooknerd.com
Welcome to another Sunday card share friends,
I couldn’t resist Sparky here, the Doodlebug 3D sticker was just to cute to pass up.
As much as I like doing different techniques and more complicated projects, I love a simple card design.

Sunday card share @ scrapbooknerd.com
I cut a circle in the red pattern paper and backed it with a yellow pattern paper circle & a couple of strips of woodgrain washi tape. I inked up the hello wood veneer with some black ink, adhered Sparky and his little bone. Now that’s a quick card 🙂 Sunday card share @ scrapbooknerd.com

I hope you found some inspiration today. Thank you for visiting the SN blog.

Joy @ scrapbooknerd.com

https://static.inlinkz.com/ppr.jsScrapbookNerd.com

Sunday card share #20

Sunday card share at scrapbooknerd.com

Hello again friends,
I have a question for you this week, do you mix cream tones with white on your projects?

There seems to be a divide amongst the crafty friends I asked this past week. The ones who said they didn’t like it seemed to be very adamant  that the two colours should not be mixed, ever. Then there were a few that said they don’t mind the mix.

As you can see, from my card below I don’t mind cream coloured papers mixing with white. 🙂
The old book text that I used in the background in real life is very yellowed & brittle. I toned down the yellowing with some plain white paint. I used my hands to apply the paint and as I rubbed the paper it ripped,  I went with it and glued the torn paper to the white card base and I really like how it looks…I love those happy accidents.

Sunday card share - scrapbooknerd.com Sending Smiles card by Joy

Products used: standout stickers and pattern papers from the Crate Paper Confetti collection

Joy @ scrapbooknerd.com
See you again next Sunday 😀 

//static.inlinkz.com/cs2.js?v=116

ScrapbookNerd.com

Sunday card share #18

Sunday card share at scrapbooknerd.com

Hello everybody,

Hope you are enjoying your weekend. My card this week uses some Crate Paper Craft Market die cuts, tags & stickers. Crate Paper products lends it’s self so well to the vintage side of things. I love using vintage photo distress ink on the edges of the papers to add to the vintage feel, it also helps all of the parts come together.

Sunday Card share @scrapbookNerd.com

What have you been making this week?
I would love to visit your blog to check out your cards, share a link below.

See you next week.

//static.inlinkz.com/cs2.js?v=116

ScrapbookNerd.com

Sunday card share #15

Sunday Card Share scrapbooknerd.com
Welcome back to another SCS,

I love to make and send thank you cards, admittedly I don’t send them out often enough though. I must work on that 😉 I used distress inks and watercolour paper for everything except the card base for this weeks card. (ink colours – Old paper, Salty Ocean, & Spiced Marmalade)
I did some stencil work and water flicking to add a bit of interest to the cups & saucer, then added a die cut sentiment from the script celebrate die set from Tim Holtz & Sizzix.

Thank you card - Sunday Card Share @ scrapbooknerd.com

Thank you card - Sunday Card Share @ scrapbooknerd.com

Thanks for visiting and I’ll see you next Sunday.
Link up your card below.

Joy @ scrapbooknerd.com

//static.inlinkz.com/cs2.js?v=116
ScrapbookNerd.com

Sunday card share #13

Sunday Card Share scrapbooknerd.com

Hey there y’all,
I’m back with another watercolour card and I used the Chubby Chum stamp set from Paper Smooches again. I cut a 3×4 card using the stitched card die from Lawn Fawn and that die set comes with a banner and 5 little shapes, I used the stars with some glitter paper to embellish this card.

I really like using 3D foam squares to pop shapes up off the card base, it provides the perfect place to tuck little pieces to help create some depth and interest.

Sunday card share - birthday card by Joy at scrapbooknerd.com


I would love to see what you are making, use the link below to join in on the card share for July.

//static.inlinkz.com/cs2.js?v=116

Joy @ scrapbooknerd.comScrapbookNerd.com

Sunday card share #12


Sunday Card Share scrapbooknerd.com

It’s Christmas in July baby!!
Last card share started a bit of a watercoloring kick for me, I spent some time colouring all of my Chubby Chums 🙂 two stamp sets from Paper Smooches. I use Distress Markers and a water brush pen. I went for a different card size this week too, this one is 4.5″x4.5″.


Merry KissMoose cared - Sunday Card Share @ ScrapbookNerd.com

Are you making cards for Christmas in July?
It’s your turn to share, use the link up below to add your card creations.
Stephanie @ scrapbooknerd.com

//static.inlinkz.com/cs2.js?v=116


Supplies:
Paper Smooches - Chubby Chums & Chubby Chum Pals stamp sets & matching dies
Pattern Papers - 6x6 Basic's Paper pad from Simple Stories
Distress Markers
Tim Holtz - Water brush Pen
Spellbinders Circle layering die
Other:
White cardstock
Woodgrain pattern paper
ScrapbookNerd.com