Tag Archives: Dina Wakley paints

Art journal cover

New Art Journal – Decorating the Cover

mixed media Monday at scrapbooknerd.com

Hi ya!
I’m starting a new art journal and I actually decorated the cover for once. Most of my journal covers are still blank with some messy paint splatter on them. This Journal is the new Vicki Boutin Junque Journal and I’m excited to start using it.

Decorating the cover of your art journal

decorating my art journal cover decorating my art journal cover

I created a quick time-lapse video to share the process, I hope it gives you some ideas to try.

decorating my art journal coverMy goal was to get some of my favourite paint colours on the cover and play with some new stencils. It’s messy and I like it. 🙂

If you have any questions, let me know in your comments.
Happy crafting!

Joy @ scrapbooknerd.com

ScrapbookNerd.com

Mixed Media – Home decor

mixed media Monday at scrapbooknerd.com
Hi ya, Joy here today with a fun home decor project for today’s mixed media inspiration.
I’ve had this project in my head for a while and I actually want to make a series of 3 for my niece’s bedroom. 

Mixed Media cross stitch hoop wall art - The Crafter's Workshop stencil - Octogonal Lace

I used a piece of canvas fabric in the hoop and glued the fabric to the inner hoop so I could work on it without the frame on it. This made it easier to use the stencil I chose and it kept the outer hoop clean.

I chose 4 paint colours and sponged it onto the canvas, I overlapped the colours and it’s not perfect. I wanted the final project to look worn.

Be Brave cross stitch hoop wall art

I printed off the sentiment be brave using the Miss Molly font. I then used that as a template to poke holes into the sticky-back canvas. The piece I stitched into was about 3″x4″.
After I finished stitching, I trimmed down the canvas and pulled out some of the threads to create a frayed edge.
Be Brave cross stitch hoop wall art

After everything was dry, I used some Matte Medium on the back of the stitched sentiment to help hold it on securely. I really wanted to pattern to stand out so I didn’t add any more embellishment. I’m considering sewing on a few sequins if my niece likes the sparkle. 🙂

If you have any questions let me know in your comments. Thanks for stopping by the SN blog.

Joy @ scrapbooknerd.com

https://static.inlinkz.com/ppr.js

ScrapbookNerd.com

Mixed Media Favourites

Welcome back friends,
I’m back to share some projects that I created using some of my favourite things.
1. Making my own background papers
2. Paint!
3. Dina Wakley stamps

Mixed Media cards using Dina Wakley paints & stamps
I started with a sheet of 8 1/2 x 11 paper that I created with paint, stamps and stencils. Then cut it down into several pieces including one tag.  
Mixed Media cards using Dina Wakley paints & stamps
All of the focal images have been stamped, cut out, and popped up with foam tape. I added a few details to some of the cards with paint, stamps and the tube from a paper towel roll.

Mixed Media cards using Dina Wakley Media paints & stamps
Mixed Media tag using Dina Wakley paints & stamps
Some of the sentiments are from the Tim Holtz Small Talk sticker book. Another favourite product of mine. 🙂

Mixed Media cards using Dina Wakley paints & stampsThank you for stopping by the SN blog.  Check out some of our previous posts about creating your own backgrounds – background papers and making my own background

Joy @ scrapbooknerd.com
ScrapbookNerd.com

Mixed Media on Monday

mixed media Monday at scrapbooknerd.com

Welcome back everyone,
I’ve been art journaling for a few years now and I still feel like I’m finding my style.
Some pages are full of texture and colour, others have more white space and I only use paint. Our art journals can be anything we want them to be and that means anything goes.

My page today started with a piece of deli paper that had paint on it, I think it was a scratch paper I was cleaning my brayer on and it gave me a colour palette to work with.

The girl on this page came from a magazine, I keep a stack of images in my stash and add to it when I get some fashion mags from my sister-in-law.
I usually add a quote to my pages but I couldn’t decide on one to use for this page so for now it’s blank.Art journal page by Joy @ scrapbooknerd.commixed media art journal page
mixed media art journal page

If you have any questions please let me know in your comments.
Thank you for stopping by. Happy crafting!

ScrapbookNerd.com

Mixed Media on Monday

mixed media Monday at scrapbooknerd.com

Hello all,

It’s time for some more mixed media inspiration and as promised I am using the papers
I made in the MMM post two weeks ago. If you want to check out that post
you can click right here.DYI art journal paper
I get so much enjoyment out of creating art journal pages, it’s so relaxing and I just put things on the page. No stressing over choices and lots of colour!
If you have any questions about any part of the process or need some clarification on the techniques I used, please leave me a comment. I would love to hear from you. 🙂

Here we go.
1. I cut up the DIY paper into strips of varying widths and then adhered them to my blank art journal page
Mixed media on Monday

2. Using similar colours of paint and a brayer, I rolled on some colour overtop of the entire page and then started adding some layers with stencils, paint and a sponge.Mixed media on Monday

3. After adding several different stencils, I tore some pages from a magazine and added strips to the page. The next layer I added was some stamping with black Archival inks, then some doodling with a permanent black pen.Mixed media on Monday

4. The finishing touches were added by inking the edge of the entire page with black ink, adding a quote and then adhering the red arrow. When glueing things down, I like to use a matte medium.Perfect is Overrated art journal page by Joy. @scrapbooknerd.com
Let me know if you have any questions in your comments.
Thank you for visiting with me today, I will be back again next Monday. 

https://static.inlinkz.com/ppr.js

ScrapbookNerd.com

Mixed Media on Monday

mixed media Monday at scrapbooknerd.com

Welcome friends,

I wanted to share the process of making some background papers with you this week. I’m going to use & share the projects I create with these homemade papers upcoming posts. Making your own backgrounds can work for a lot of your projects including, collage, cardmaking and scrapbook layouts.

Making your own background paper @ scapbooknerd.com
I started with some old pattern papers from my stash, gesso, and an old door key. I added a very thin layer of gesso to both pages, you can see in the photo below how thin the layer of gesso is.Making your own background paper @ scapbooknerd.com

I grabbed my paintbox and got to work. I added some colour with my hands on one paper, I used the old door card again on the other sheet.Making your own background paper @ scapbooknerd.com
Below you can see the first couple of layers of paint I added. I got out some stencils, a brayer, molding paste, and some other tools to create some texture.Making your own background paper @ scapbooknerd.com

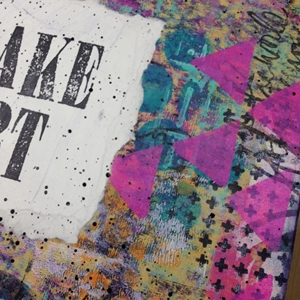
You can now see in the photo below the depth on the pages. In some areas, I used the same colour of paint on top of each other with different stencils.
Making your own background paper @ scapbooknerd.com

I created one page with warmer colours and the other page with cooler colours.
Making your own background paper @ scapbooknerd.com

Below you can see both of the complete papers. In real life, you can still see the original pattern on the paper and on the page on the right the pattern was almost completely covered.
Stayed tuned for some projects using these papers on January 30th.

Making your own background paper @ scapbooknerd.com

Next week I will be sharing some of the amazing projects I know I will be seeing at the Creativation Show. Have a great week everyone. 🙂 Joy @ scrapbooknerd.com

ScrapbookNerd.com

Mixed media on Monday

mixed media Monday at scrapbooknerd.com

Hi there, Joy here with some art journal inspiration for this weeks Mixed Media on Monday.
This week I was inspired by Brigit Koopsen, a talented artist who designs stamps for Carabelle Studios and has an awesome blog with so much mixed media inspiration.

I pulled out my old brayer and some Dina Wakley paints and started on my colour block background. It’s a pretty simple way to get a basic background started and you can also create the same look with paint brushes.

Now since I’m not much of a doodler, I used stencils and stamps to help me add some interest to this page.
mixed media, art journal
Now most of this background will end up being covered by the time I’m finished. I use to think this was crazy back when I was learning about mixed media… Why did people cover up all that awesomeness?

Well it’s for good reason and I now I don’t even blink at eye at doing this in my own art journal or on a canvas.
mixed media, art journal
Here’s a close up of some of the detail & stencilling…
mixed media, art journal
I stencilled in the houses with black paint, then covered the sky area with gesso and then a layer of Sky Dina Wakley paint. Now because the paint it semitransparent you can still see some of the work I covered up.

After the sky was finished I had to redo the houses as I was not that neat when painting the sky.
Mixed media on Monday @ scrapbooknerd.com - Art Journal page by Joy Atkinson
The trees were created with a leaf style stencil & Lime paint. I doodled around the shape
to finish them off.

Now in my opinion every house should have a dog, so I added a little stamped image from the My Favourite Things Top Dog set. Isn’t he cute? 😀

mixed media, art journal page with Lucy Dog stamp from My Favourite Things
I did go back in with more stencils before adding my sentiment, I finished it all off with some simple doodles on the houses and some white paint splatters.

mixed media, art journal
Happy arting my creative friends.Joy @ scrapbooknerd.comScrapbookNerd.com

Mixed media on Monday – easy backgrounds

mixed media Monday at scrapbooknerd.com

Creating backgrounds in a art journal does not have to be complicated and take a lot of time to complete. It can be as simple as a few swipes of leftover paint.

All of the pages I am sharing today were created with leftovers or supplies I was using on another project and instead of just cleaning up after that project I took a few minutes add to some blank art journal pages.

mixed media on Monday at scrapbooknerd.com
The first two pages here are not finished yet, but they are a great starting points and only need a little more work and a focal image. You can see brushstrokes, stencil work, some watery splotches of colour and even some finger painting. Quick ways to add colour to a blank page.mixed media on Monday at scrapbooknerd.com
Here’s one page where I colour blocked with the extra paint, then came back with some stencils, a few more paint colours and a quote to finish it off.  The result is a fun page that took only a 15 minutes or less to create because the background was ready ahead of time.mixed media on Monday at scrapbooknerd.com
I hope you found some inspiration in todays post and feel like you can create simple pages or projects with the leftover supplies on your workspace.

You might even consider a “use it up” journal or book to just create random backgrounds for quick creating later on.
Joy @ scrapbooknerd.com ScrapbookNerd.com

Mixed Media on Monday

mixed media Monday at scrapbooknerd.com
Hello everyone!
Today I have a special post for Mixed Media on Monday.
Over the past weekend I attended a few classes with Dina Wakley to learn some new techniques to add to my creative arsenal. (This post is in now way affiliated with Dina Wakley.com)
It was a fabulous weekend, Dina really challenged us & we all made a lot of art.

Art journal page. scrapbooknerd.com

For the first time in my adult life I tried drawing faces (seriously) after learning how from Dina. There was a real marked improvement from the start of class to the last face we painted. Such a big difference. It’s something I have to work on so I can get better at it.

I have 96 more to go as Dina committed all us to drawing 100 faces.  😀
Dina style faces

We made are own papers, learned the power of a mark and used some of the papers we made to add layers to tags and journal pages.Dina syle papermaking marks with dina Dina_styletag

After returning home and getting some sleep, I made an art journal page Dina style with a few of the techniques I learned in class.
art journal page by Joy @scrapbooknerd.com

If you ever get a chance to take a class with Dina Wakley, I would highly recommend it.
Dina is not only a talented artist, she is so funny, she makes learning easy and the techniques doable so you can go home and replicate it. (This post is in no way affiliated with Dina Wakley.com) 

Joy @ scrapbooknerd.com

Thanks for stopping by the Scrapbook Nerd blog today. Have a great week everyone!

ScrapbookNerd.com

Sunday card share #40

Sunday card share at scrapbooknerd.com

Happy Sunday friends,
I love using my mixed media style stamps for cardmaking and my card this week uses the Dina Wakley Scribbly Birds stamp. These little birds are a favourite and a I use them often.

Sunday Card shares at scrapbooknerd.com

I used acrylic paint to ‘colour’ the bird, create my background for this card and with the stencils I used. The branch the bird sits on is made with torn washi tape & finally the sentiment stickers I used are from the Tim Holtz Small Talk sticker book.

Sunday Card shares at scrapbooknerd.comThanks for stopping by the SN blog today, if you have any questions about today’s project please let me know in your comments. Take care!

http://static.inlinkz.com/ppr.js

Joy @ scrapbooknerd.com

ScrapbookNerd.com Canadian online paper craft supply store