Category Archives: Mixed Media on Monday

Reworking Backgrounds

Hello everyone!

Hope you are all enjoying this new week!  It is time for a new tutorial, and this time i wanted to show a way to rework those layouts we some-and/or-many times we end up not loving after they are completely finished.

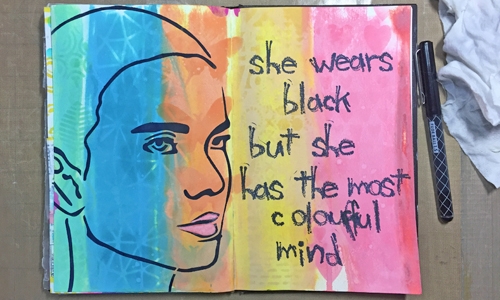
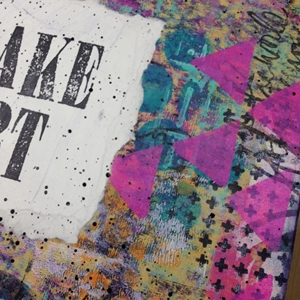
This is the original layout i had created for this tutorial, i wanted to show you a quick and easy mixed media background, but i think i got carried away, and ended up not loving the finished product.  So i set it aside for a while, and played with a few ideas, but i knew that it was not up to my liking, so i decided to rework it.  So please enjoy the following video that will show you how this layout yielded two new layouts:


How about those layouts!!  Let me just give you  a bit more information on what i created with that salvage layout.


This new layout is similar to the original one created.   The major difference is all that extra gold stenciling that run diagonally across the opposite side of the picture.


This layout has a more refined background, and all the elements of the previous page (i kept them all as they were featured in the first page).  With this simpler design, the picture is the focus of the page, and all the embellishments (all from Pebbles’ Patio Party Collection) shine without being overtaken by the background.  Now onto the next page:


This layout features the background of the original page.  The choice to cut circles out of the original lbackground takes away the busy pattern that all that extra stenciling created on the page.


A bit of a watercolor brings a new clean canvas for all those background circles.  Due to the bold pattern of the circles, just a few of them are enough to complete the page, and add dimension to the layout at the same time.


To balance the bold pattern in the circle, the rest of the layout’s embellishments were kept simple, so that the picture becomes the focus of the page.

I am sure some of you might think that reworking a background into other pages might be a bit of a stretch, and i completely understand.  But  this might serve as inspiration to create your own patterned paper (so you could create shapes out of it), or to try a simple mixed media background.    It is completely up to you!

As always please do not hesitate to contact me with any questions or concerns.  I would love to help you, it at all possible.  Remember to stop by Scrapbook Nerd  to check all the materials used in this page.

XO

Nathalie D - designer at scrapbooknerd.com


Patio Party collection and embellishments – Pebbles

Vicki Boutin Art Crayons,  gesso,  ephemera, rub on, glitter word, gold and iridiscente glaze,

Pebbles_ NIght Night word foam thickers.

Art Journal page using Distress Oxide Inks and TWC stencils

Art Journal page using Distress Oxide Inks

mixed media Monday at scrapbooknerd.com

Hey there friends,
I have really been enjoying Distress Oxide Inks and I decided to work with them in my art journal. I used the inks directly on the pages of my art journal, pulling them down the page from top to bottom.
Art Journal page using Distress Oxide Inks and TWC stencils

After adding the oxide ink, I held my journal on end and sprayed both pages with water. Enough water to get it dripping down the page. Adding the water to oxide ink is important to get that oxide reaction working.

After the pages were dry, I added stenciling to each of the colour blocks with the same colour of ink. Oxide inks are great for layering, each layer added sits on top of the last layer.
Remember to dry between layers.Art Journal page using Distress Oxide Inks and TWC stencils
The face stencil is from The Crafter’s Workshop and I used Dina Wakley Night paint to stencil the face on the left-hand page. I found the black quote on Pinterest and stamped in on my journal page with a Dina Wakley Alpha stamp set and black archival ink.Art Journal page using Distress Oxide Inks and TWC stencils

I missed stamping the letter ‘r’ on my page so I had to go back and write it in.
It’s far from perfect but I’m okay with that.

I hope you found some inspiration in today’s post.
I would love you hear if you’re loving Distress Oxide Inks and how you enjoy using them.

Happy crafting!!

Joy @ scrapbooknerd.com

ScrapbookNerd.com


Mixed Media art journal page

Art Journal page

mixed media Monday at scrapbooknerd.com

Hello crafty friends,
Last week in our mixed media post I shared how I decorated my new junque journal cover.
This week I’m sharing the first page in this journal.
Decorating the cover of your art journalAs you can see I used a lot of the same colours, they’re some of my favourites from the Dina Wakley heavy bodied paints and I even used some of the same stencils. This kraft colour, folded art page is from the refill pack from the Vicki Boutin Junque Journal.


I thought a little bit about how the interior page went with the folded flap but tried not to over think and just used the same paint colours.  Using some torn tissue pieces I created a visual triangle to help lead the eye. One of the pieces is folded over the crease so it peeks out when the page is closed.
I just had fun with several different stencils to create this page. Quick and easy.
I really like how some of the pages in this journal are already folded, it’s something so simple, but I just don’t think about doing that.

Mixed media art journal, junque journal page What have you been working on lately?

I hope you found some inspiration for your own art journal pages. If you have any questions let me know in your comments. Happy crafting!

Joy @ scrapbooknerd.com

ScrapbookNerd.com

Art journal cover

New Art Journal – Decorating the Cover

mixed media Monday at scrapbooknerd.com

Hi ya!
I’m starting a new art journal and I actually decorated the cover for once. Most of my journal covers are still blank with some messy paint splatter on them. This Journal is the new Vicki Boutin Junque Journal and I’m excited to start using it.

Decorating the cover of your art journal

decorating my art journal cover decorating my art journal cover

I created a quick time-lapse video to share the process, I hope it gives you some ideas to try.

decorating my art journal coverMy goal was to get some of my favourite paint colours on the cover and play with some new stencils. It’s messy and I like it. 🙂

If you have any questions, let me know in your comments.
Happy crafting!

Joy @ scrapbooknerd.com

ScrapbookNerd.com

Home Decor – Quote Sign

mixed media Monday at scrapbooknerd.com

Hello nerds,
Joy here today with a home decor project that is a great gift idea or a project to keep for yourself. Making your own quote board or sign at home can be easy to do with stencils.
You can buy a stencil or cut your own with a digital die cutting machine, for my project today I used the Silhouette Cameo to cut the quote from cardstock.
Mixed Media quote, home decor idea

I set my machine to double cut to be sure to get a nice cut on the fine detail on some of the letters. The stencil is cut from white 12×12 cardstock and can be reused, be sure to keep the inside cuts on the letters.

Stencil cut on Silhouette Cameo

The key to clean crisp lines when stenciling is to use a dry sponge or brush with a small amount of paint. You can always go back in with another coat of paint. You can see on my project there is some paint bleeding, I should have removed some more of the paint from my sponge.
You can cover the paint bleed after with a small detail brush and the paint you use on the base of your project.  

Because my project is distressed, the extra paint looks okay and goes with the overall feel I was going for when I created the background with acrylic paint and doilies.

I used white paint and a brayer to add some highlights. I held the brayer with a very light touch so it would just skim across the surface.  When everything was dry I went in with a stamp to add some subtle texture and interest. I chose an ink colour similar to the paint colour so it would blend in. 

If you have any question about how this came together, please let me know in your comment.
Thank you for stopping by the SN blog today, I hope you give this a try.

Joy @ scrapbooknerd.com ScrapbookNerd.com

Mixed media canvas

Mixed Media canvas

mixed media Monday at scrapbooknerd.com

Welcome back to the SN blog, today I’m sharing a 6″ x 6″ canvas project. This project is grungy and really textured, I hope you can see that in the photos.

Mixed media canvas

I started this off with some plain tissue paper, crumpled it up into a ball then used matte medium to adhere it to the canvas. I made sure to scrunch the tissue I was gluing it down for some deep wrinkles. After it dried completely I used molding paste, a palette knife, and several stencils to add even more texture.

Mixed media canvas

I cut some circles out of some book text, the circles are wonky because I hand cut them. I stuck the circle to the canvas making sure to wrap them over the edges. Using a permanent marker I drew the circles multiple times in a messy way around the text paper.
Mixed media canvas

I used one orange rusty colour for the entire canvas and applied it heavily around the circle so I could get some drip marks.

Creating the layers on this canvas were all done with stencils. I brought in 3 more paint colours; black, burgundy, and turquoise and used those with some more subtle stencil patterns.  
Mixed media canvas

The finishing touch on this grungy canvas was to add some white paint to lighten it up a bit. I used my fingers to rub the white paint across the surface, highlighting the texture even more.

I hope you found some inspiration in today’s post, thank you for stopping by the SN blog.
If you have any questions please post them in your comments. Happy crafting!

Joy @ scrapbooknerd.com

ScrapbookNerd.com

Mixed media canvas project

mixed media Monday at scrapbooknerd.com

Hello Scrapbook Nerd friends,
I hope you had a nice Easter long weekend, I had a fun day with my family out in Port Elgin.
I’m already looking forward to the leftovers and turkey sandwiches. 😀

The mixed media share today is a 6×6 canvas board.
This canvas project has 3 layers; it starts with the script background, some tissuestock from Canvas Crop., some paint, and the final layer is the coffee cups & title.But First Coffee- mixed media canvas board projectI like the grungy background and it really makes those cups pop off the page. The ‘table’ the cups are sitting on was created with the Ornate stencil and some umber paint. The cups were die-cut from the Atwell 6×6 paper pad and two of the cups have some light stenciling on them for some added interest. I added a hand drawn border before adhering the words, I think it helps contains things and gives it a finished look.

Mixed Media canvas

I hope you found some inspiration today. If you have any questions please post them in your comment. Happy crafting!
Joy @ scrapbooknerd.com

https://static.inlinkz.com/ppr.js

ScrapbookNerd.com

Mixed Media – Home decor

mixed media Monday at scrapbooknerd.com
Hi ya, Joy here today with a fun home decor project for today’s mixed media inspiration.
I’ve had this project in my head for a while and I actually want to make a series of 3 for my niece’s bedroom. 

Mixed Media cross stitch hoop wall art - The Crafter's Workshop stencil - Octogonal Lace

I used a piece of canvas fabric in the hoop and glued the fabric to the inner hoop so I could work on it without the frame on it. This made it easier to use the stencil I chose and it kept the outer hoop clean.

I chose 4 paint colours and sponged it onto the canvas, I overlapped the colours and it’s not perfect. I wanted the final project to look worn.

Be Brave cross stitch hoop wall art

I printed off the sentiment be brave using the Miss Molly font. I then used that as a template to poke holes into the sticky-back canvas. The piece I stitched into was about 3″x4″.
After I finished stitching, I trimmed down the canvas and pulled out some of the threads to create a frayed edge.
Be Brave cross stitch hoop wall art

After everything was dry, I used some Matte Medium on the back of the stitched sentiment to help hold it on securely. I really wanted to pattern to stand out so I didn’t add any more embellishment. I’m considering sewing on a few sequins if my niece likes the sparkle. 🙂

If you have any questions let me know in your comments. Thanks for stopping by the SN blog.

Joy @ scrapbooknerd.com

https://static.inlinkz.com/ppr.js

ScrapbookNerd.com

Mixed Media Favourites

Welcome back friends,
I’m back to share some projects that I created using some of my favourite things.
1. Making my own background papers
2. Paint!
3. Dina Wakley stamps

Mixed Media cards using Dina Wakley paints & stamps
I started with a sheet of 8 1/2 x 11 paper that I created with paint, stamps and stencils. Then cut it down into several pieces including one tag.  
Mixed Media cards using Dina Wakley paints & stamps
All of the focal images have been stamped, cut out, and popped up with foam tape. I added a few details to some of the cards with paint, stamps and the tube from a paper towel roll.

Mixed Media cards using Dina Wakley Media paints & stamps
Mixed Media tag using Dina Wakley paints & stamps
Some of the sentiments are from the Tim Holtz Small Talk sticker book. Another favourite product of mine. 🙂

Mixed Media cards using Dina Wakley paints & stampsThank you for stopping by the SN blog.  Check out some of our previous posts about creating your own backgrounds – background papers and making my own background

Joy @ scrapbooknerd.com
ScrapbookNerd.com

Mixed Media Tag

mixed media Monday at scrapbooknerd.com

Hi there,
Joy here with you today and I’m happy to share a gift tag that I created with the new
Studio Katia Mandala stamp.
This tag is very different for me because the colour combination is very outside my comfort zone. I had a hard time finishing it off and second-guessed myself, the colours changed and there are a lot of watercolour layers.

Mixed Media tag using Studio Katia Mandala stamp
I’m still not 100% happy with the way this turned out but it was great stepping outside my comfort zone. The Studio Katia stamp is a wonderful stamp and it’s a must have I think.

Mixed media on Monday @scrapbooknerd.com

I hope you enjoyed this little piece of inspiration. I hope you take a chance and use a colour combo that is outside your wheelhouse. Happy crafting!

https://static.inlinkz.com/ppr.js

ScrapbookNerd.com